Introduction
Azure DevOps, formerly known as Visual Studio Team Services (VSTS), helps individuals and organizations plan, collaborate and ship products faster. One if its noteworthy services, Azure Pipelines, helps developers build Continuous Integration (CI) and Continuous Delivery (CD) pipelines that automate and standardize the build, test and deploy phases of the software development process. In addition, Azure Pipelines provides native container support and works with any language, platform and cloud. Machine learning like software development is also a process that includes a build, test and deploy phase which makes it a good candidate for automation and standardization. At Build 2018, Microsoft announced ML.NET, an open-source, cross-plaform machine learning framework for .NET. If we were to put all of these tools and services together, it means that we can automate and standardize the training of a machine learning model built with ML.NET, package it into a Docker container and deploy it to Azure Container Instances (ACI). In this writeup, I will go through the process of building a CI/CD pipeline in Azure Devops that trains, packages and deploys an ML.NET machine learning model to predict which class an Iris flower belongs to using a variety of measurements. Source code for this project can be found at this link.
Prerequisites
The Application
Because the purpose of this post is to demonstrate the functionality of Azure Devops and not that of ML.NET, I'll start with a pre-built application. For some more information and detail into the functionality of ML.NET, check out the official documentation page as well as some of my previous posts:
- Serverless Machine Learning with ML.NET and Azure Functions
- Deploy .NET Machine Learning Models with ML.NET, ASP.NET Core, Docker and Azure Container Instances.
The application used in this writeup contains three .NET Core projects within it. One is a class library which is what we'll use to wrap ML.NET functionality for training models as well as loading pre-trained models that will then be used to make predictions. Another is a .NET Core console application which references the class library to train and persist an ML.NET model. Finally, there's the ASP.NET Core Web API which also references the class library application to load the pre-trained model created by the console application and then makes predictions via HTTP. This application can be utilized and deployed standalone but in this writeup it will be packaged into a Docker image that will then be deployed to Azure Container Instances.

Class Library
The class library can be found in the MLModel directory. The class library defines the observation and prediction data classes which can be found in the IrisData.cs and IrisPrediction.cs files respectively. Additionally, the Model class contains helper methods that train and save machine learning models, load pre-trained models and use these models to make predictions.
Console Application
In the solution directory we also have a console application in the ModelTrainer directory. This application references the class library in the MLModel directory to train and persist the machine learning model.
API
The ModelApi directory contains an ASP.NET Core Web API application that references the MLModel class library project to load the pre-trained model that is trained by the ModelTrainer console application and makes predictions via HTTP. The logic for making predictions can be found in the PredictController.cs class in the Controllers directory of the ModelApi application.
CI/CD Pipeline Flow
Conceptually, when the application is built and deployed manually, the machine learning model is defined and developed inside the MLModel class library. Once satisfied with the model, the class library is built. The console application which references the MLModel class library is built as well as run to train and persist a classification model in a file called model.zip. The MLModel class library is also referenced in the ModelApi ASP.NET Core project. Because ModelApi is the application we're looking to deploy in order to expose our pre-trained machine learning model, we need to find a way to package it for deployment. We'll be deploying ModelApi using Azure Container Instances which means we need to create a Docker image of the project that will then be pushed to a Docker registry where it will be made available for public consumption. The building of multiple projects as well as the building, publishing and deployment of the Docker image to Azure Container Instances can be standardized and automated using Azure DevOps. The rest of this write-up will focus on demonstrating step-by-step how to operationalize this machine learning application via CI/CD pipelines in Azure DevOps using Azure Pipelines.
Getting The Code
Before getting started, the first thing you'll want to do is fork the mlnetazdevopssample GitHub repository into your own GitHub account.
Creating the Project
Navigate to https://devops.azure.com, click Start Free and follow the prompts to either create a new account or sign into your existing account.
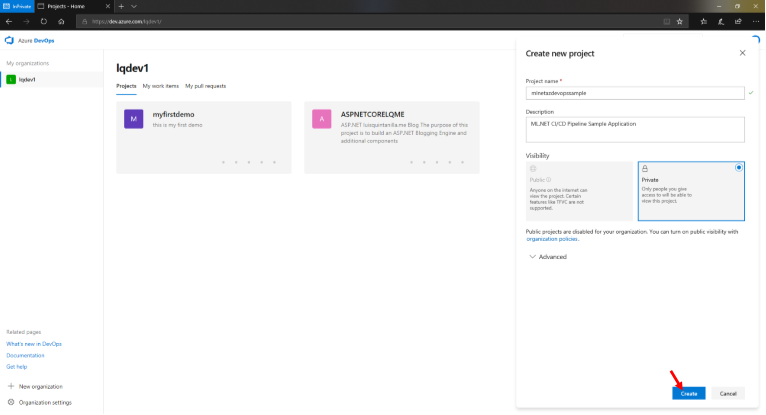
Once logged in, click Create Project.

Enter the name of your project as well as a short description. Then, click Create.
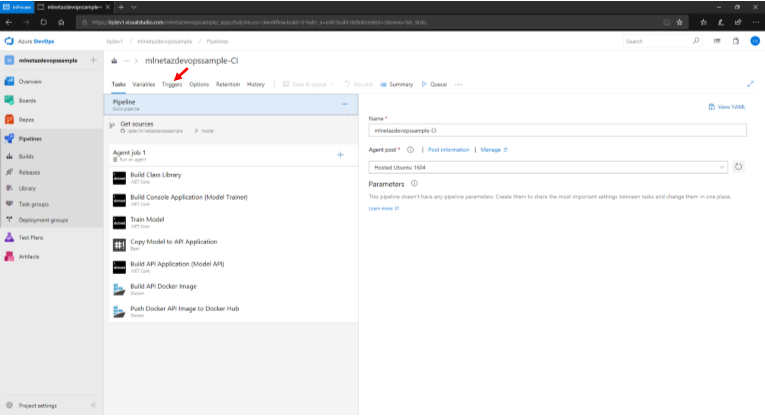
The Continuous Integration (CI) Pipeline
Using Azure Pipelines, we'll configure a CI pipeline for the build and packaging steps of our application. Below is an illustration of all the steps involved in our CI pipeline:
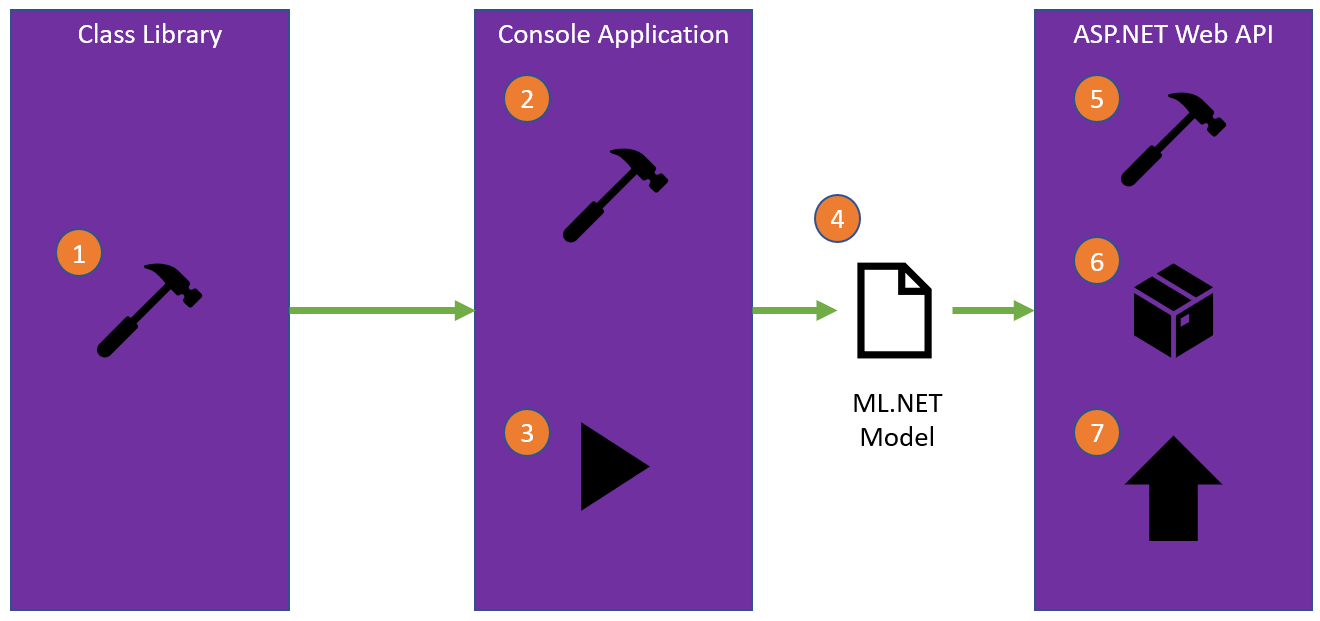
- Build the class library application
- Build the console application
- Train and persist the ML.NET Model by running the console application.
- Copy ML.NET model file created by console application into ASP.NET Core Web API application directory
- Build ASP.NET Core Web API application
- Build Docker image
- Push Docker image to Docker Hub
CI Pipeline Setup
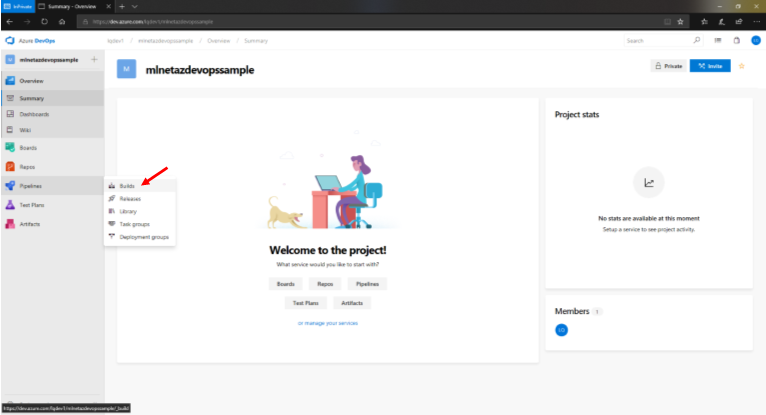
Once the project is created, in the main project page, hover over Pipelines and click on Builds.
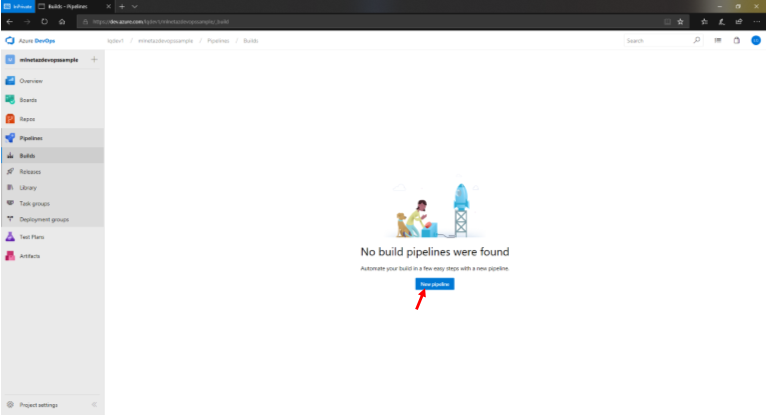
In the Builds pipeline page, click New pipeline.
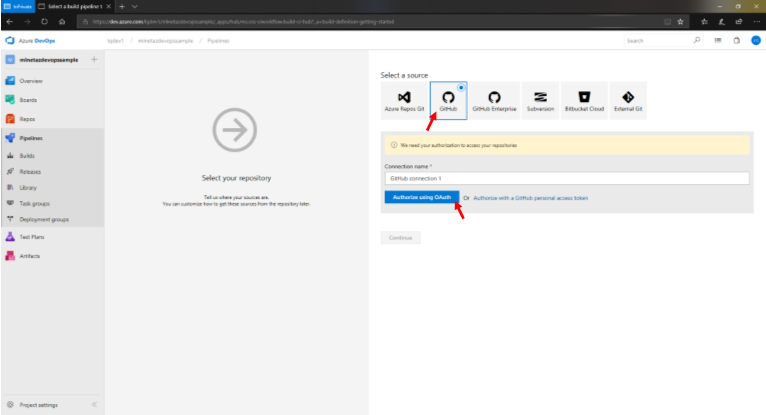
Select GitHub as the source and connect your GitHub account with Azure DevOps.
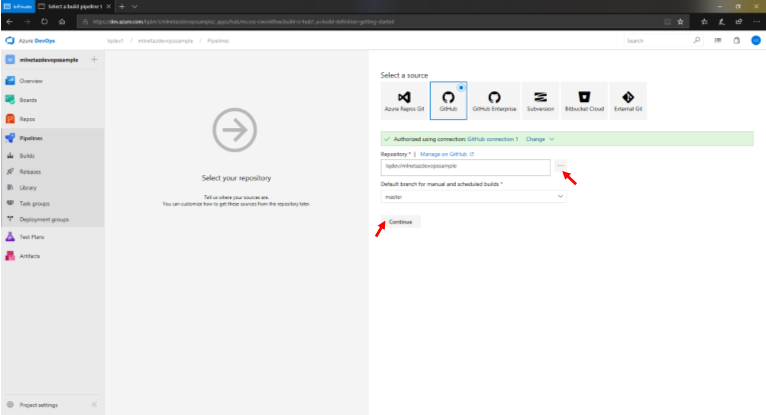
Once you have authorized Azure DevOps to use your GitHub account, select the repository and branch that will be used for this build pipeline. In our case, we'll be using the master branch of the mlnetazdevopssample repository. When finished configuring, click Continue.
The next step will be to select the jobs to execute in our pipeline. Because there are multiple steps in this build pipeline, let's start with an Empty Job and customize it to our needs.
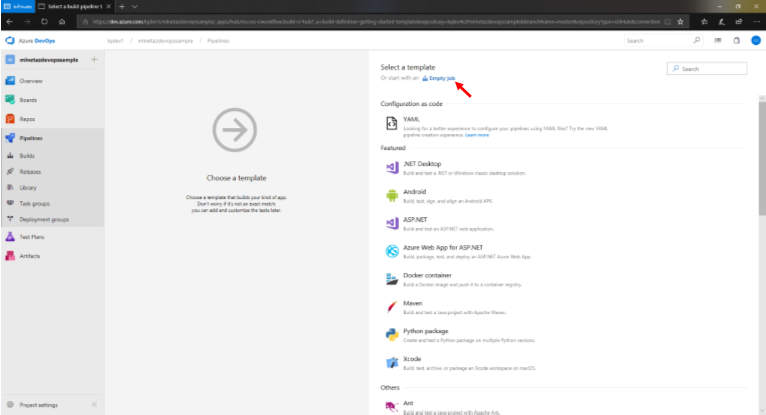
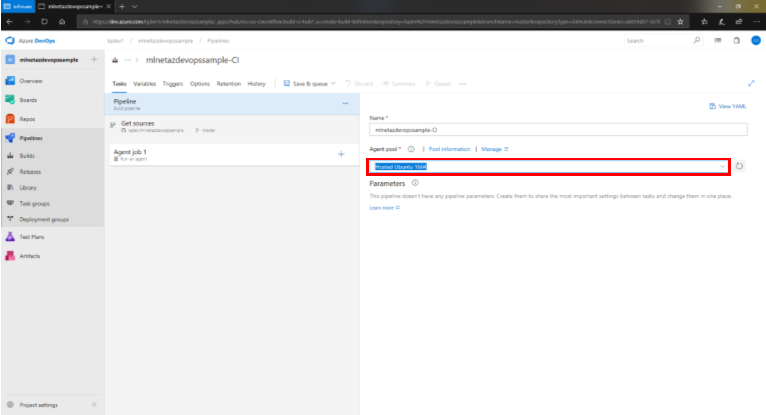
From inside the build pipeline page, before we start adding jobs, lets select the agent that will execute the jobs. For this pipeline, select the Hosted Ubuntu 1604 option from the dropdown.
1. Build the Class Library Application
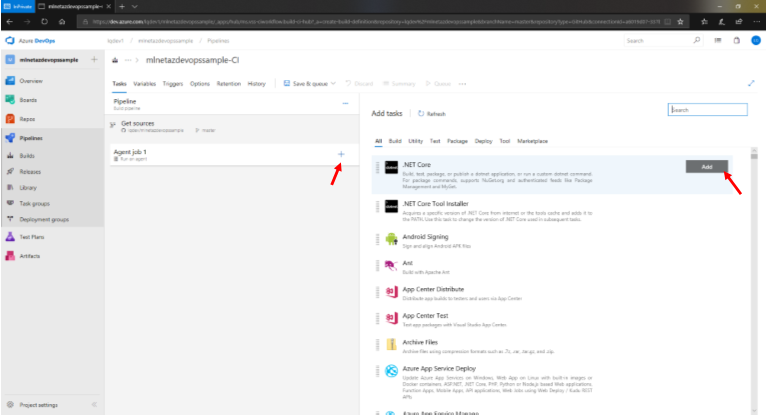
The first step in our CI Pipeline will be to build our class library which contains methods that wrap the training, loading and prediction functionality of the ML.NET framework and persisted models.
To achieve that, we'll add a .NET Core task to our Agent Job 1.
Once added to the pipeline, let's configure this task. To make it more descriptive, we can give it a name such as Build Class Library. Because this task will be responsible for building the .NET Core class library, we'll leave the default build Command setting as is.
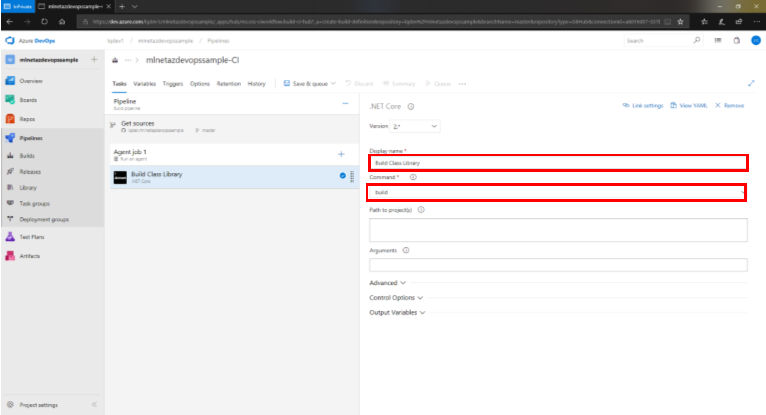
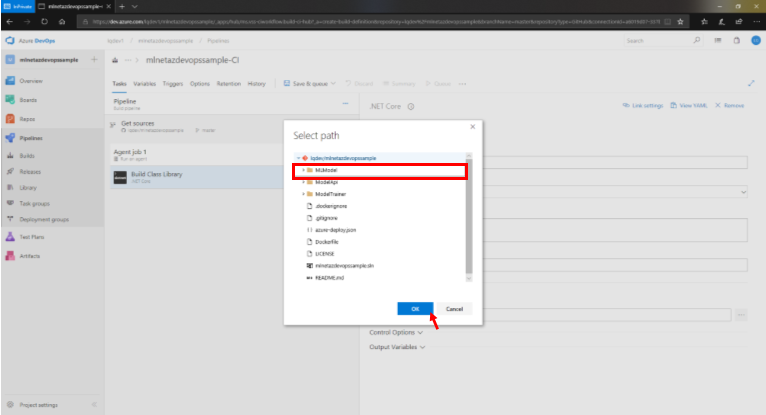
The other setting we'll want to configure is the Working Directory. We can do so by clicking the Advanced tab.
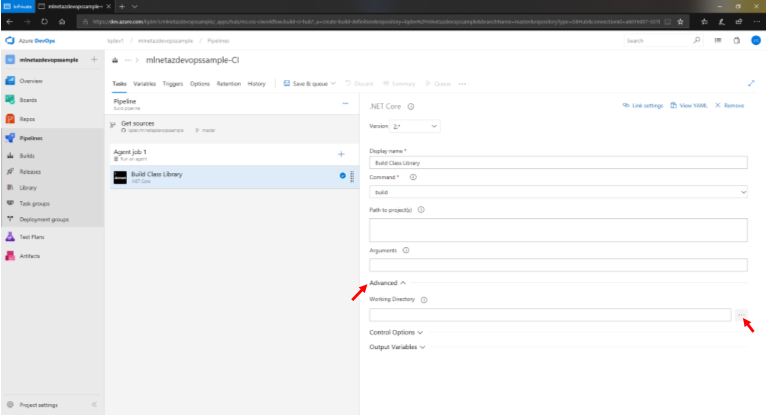
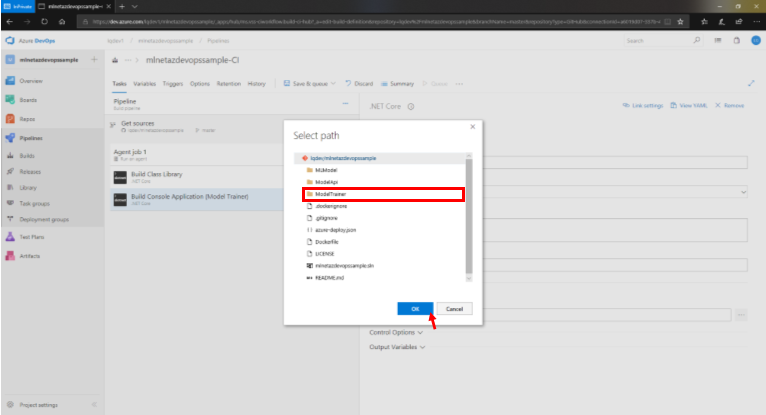
For this task we'll use the MLModel directory.
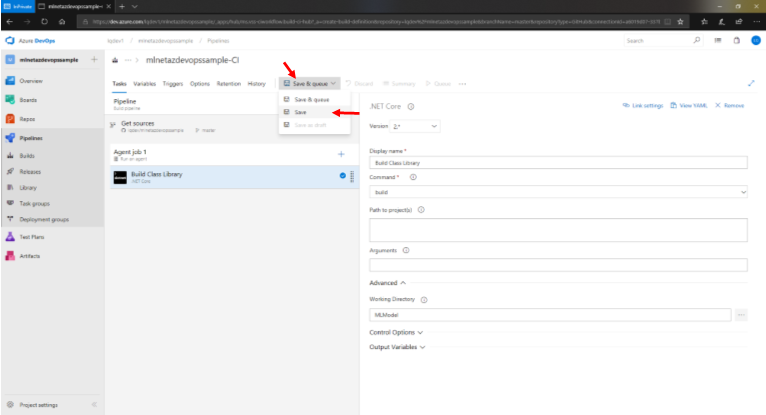
When finished with the configuration, click Save & Queue → Save on the top toolbar.
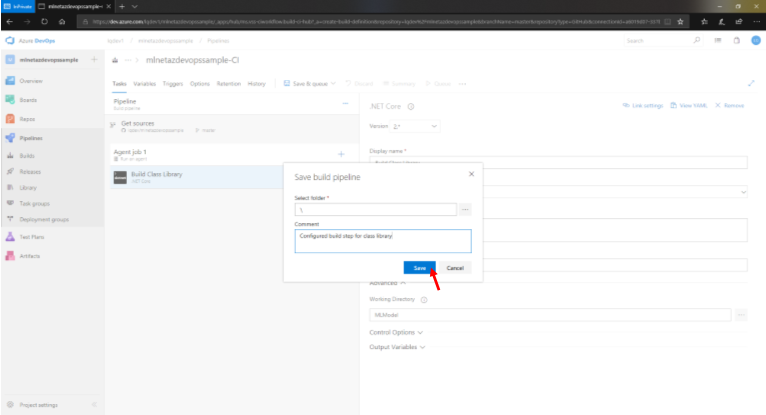
Enter a detailed comment describing the change to the pipeline and click Save.
2. Building The Console Application
Once we've built the class library application which we'll reference from the .NET Core console and ASP.NET Core Web API applications, it's time to build the console application which will serve the purpose of training and persisting the ML.NET model.
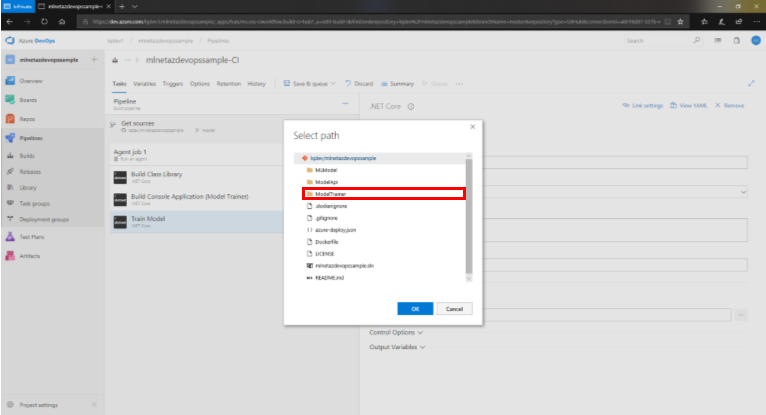
Similar to the previous step, add a new .NET Core build task to the pipeline. The only setting that will change for this task is the Working Directory which will have the value of ModelTrainer.
Although not required, when finished configuring the task, click Save & Queue → Save to save and comment the changes to the pipeline.
3. Train and persist the ML.NET Model
Now that our console application is built, it's time to run it in order to train and persist the ML.NET model. To do so, we'll add another .NET Core task. The difference is that the Command setting will now be configured with the run value.
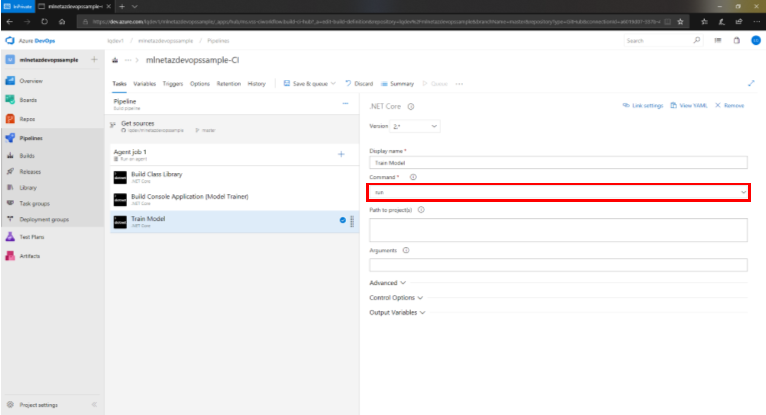
The Working Directory will be set to ModelTrainer like in the previous task.
Remember to save and comment the new changes to the pipeline.
4. Copy ML.NET Model to Web API Directory
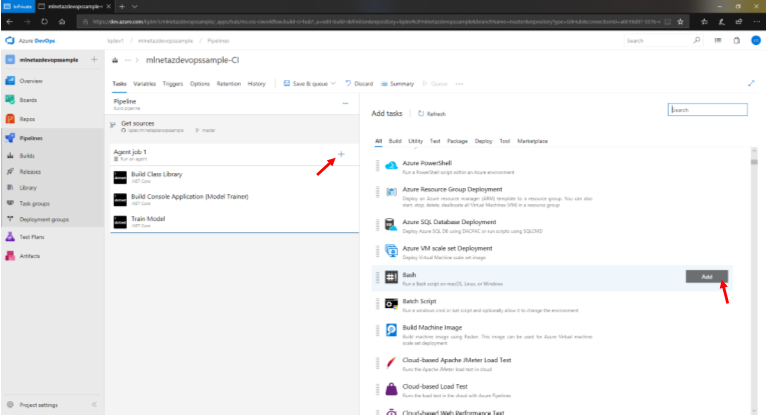
After the console application is run and the ML.NET model is trained, it is persisted in a file called model.zip inside the ModelTrainer directory. We can use this persisted version of the model to make predictions from both the console application or any other application of our choice. In this case, we'll be making predictions via an ASP.NET Core Web API. In order for our API to reference this file, we need to copy it into the root directory of our ModelApi directory. A way to perform that task is via bash script. To add a bash script to our pipeline, all we need to do is add a Bash task to it.
Once added to our pipeline, it's time to configure the task. We'll set the Type setting to Inline which will bring up a text box for us to type in the script.
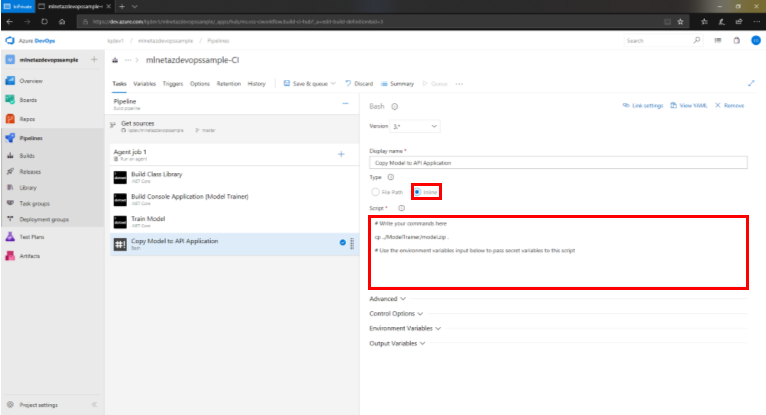
Inside of the text box, enter the following content:
# Write your commands here

cp ../ModelTrainer/model.zip .

# Use the environment variables input below to pass secret variables to this script
This command will copy the model.zip file from the ModelTrainer directory to the ModelApi directory.
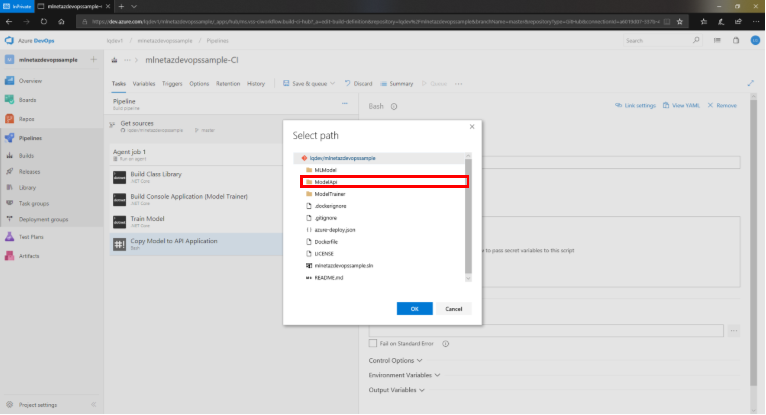
We can set the Working Directory of this step to ModelApi.
Once finished, save and comment the new changes to the pipeline.
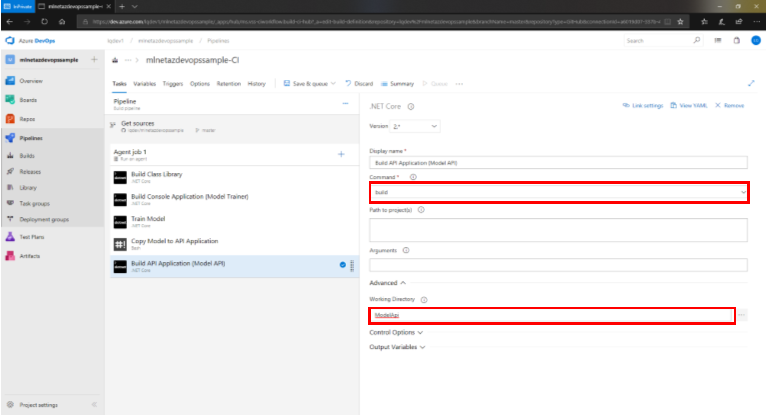
5. Build ASP.NET Core Web API application
Now that we have the necessary files inside our ModelApi application, it's time to build it. We'll add a .NET Core task to our pipeline and set the Command to build. The Working Directory will be ModelApi like the previous task.
Save and comment the new changes to the pipeline when finished.
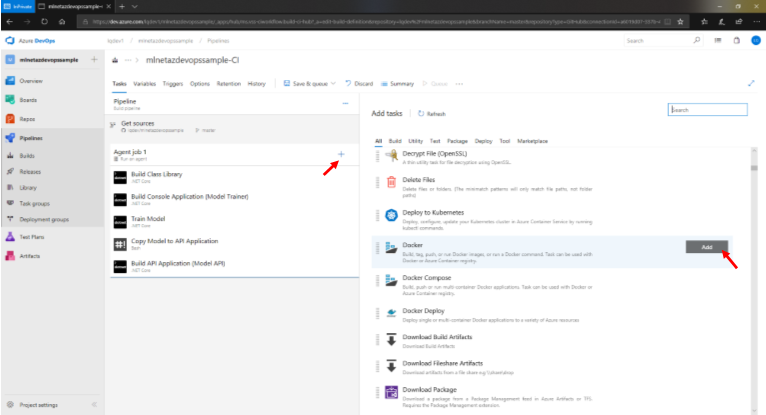
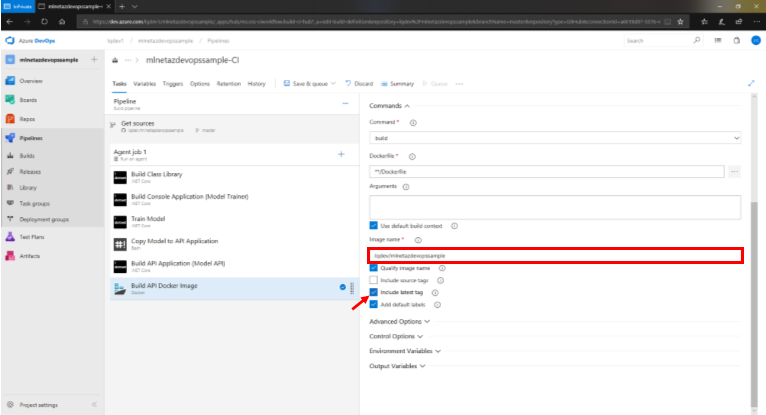
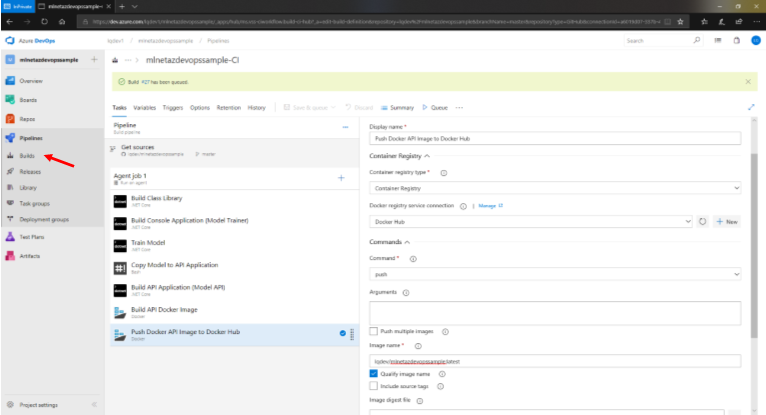
6. Build ASP.NET Core Web API Docker Image
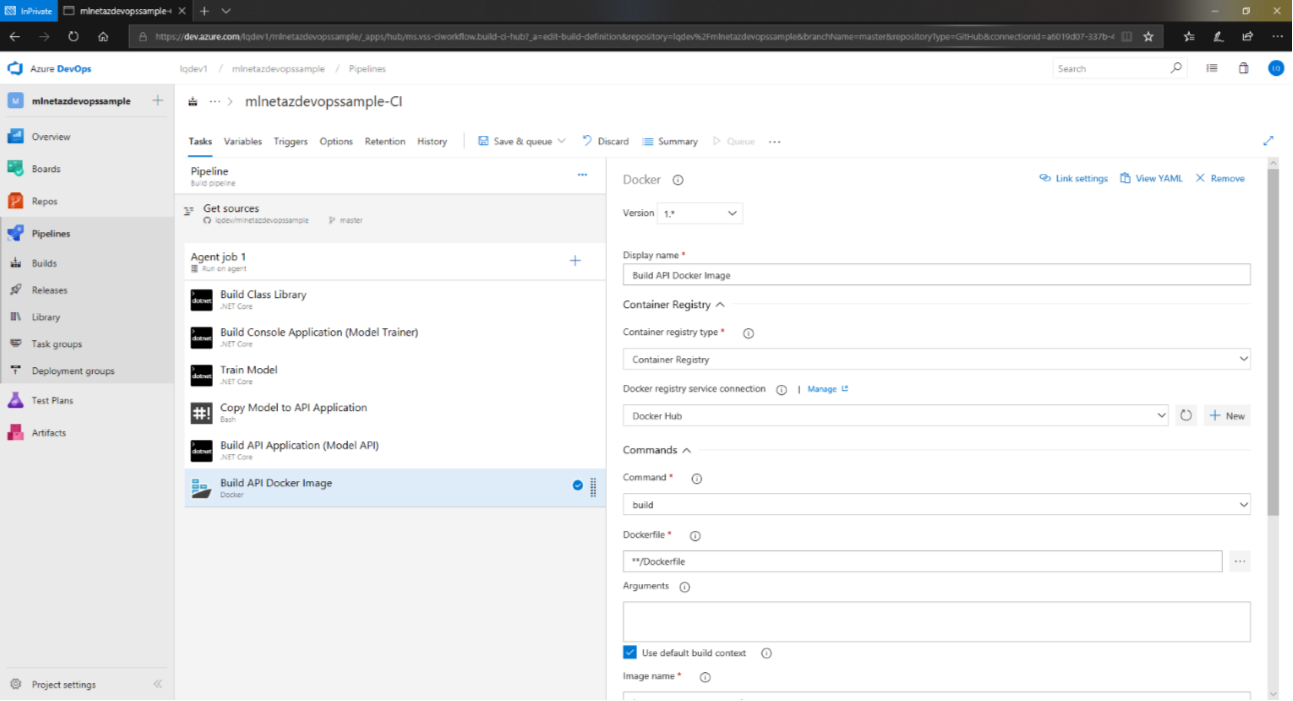
The method of deployment for the ASP.NET Core Web API application is via containers. Therefore, after building the application, we have to build a Docker image for it that can then be pushed to a Docker registry of your choice. To build a Docker image, we'll add a Docker task to our pipeline.
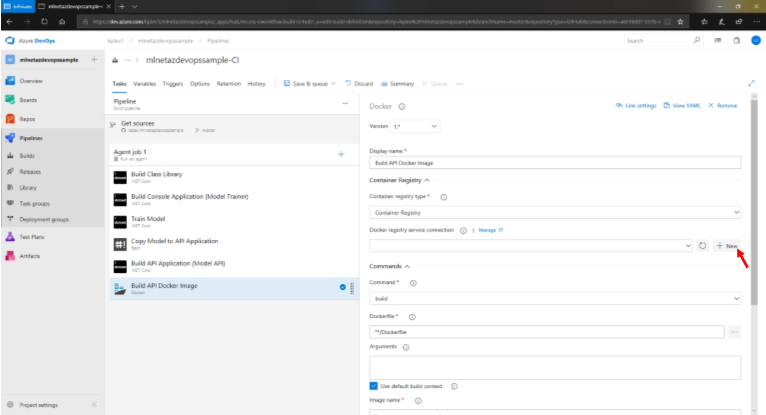
When we configure the task, we'll start off by setting the Container Registry Type to Container Registry.
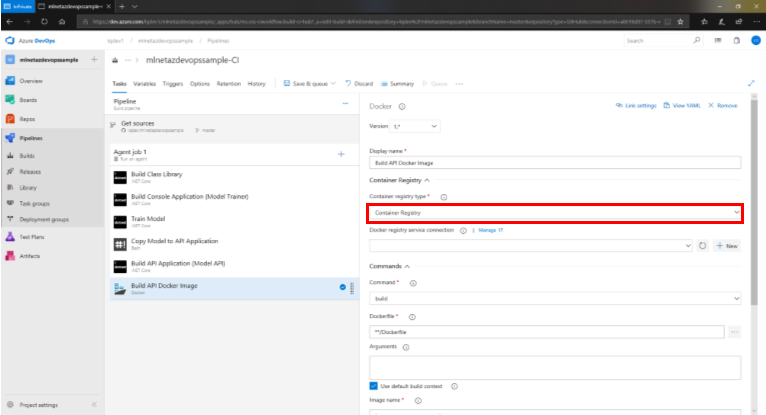
This will prompt the setup of a service connection to a Docker registry if one does not already exist.
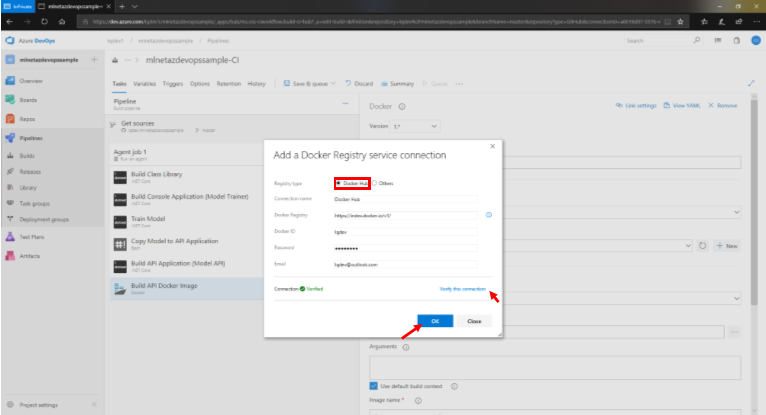
The Docker registry type we'll be using is Docker Hub. Give the connection a name, enter the credentials to your Docker Hub account and click Verify this connection to make sure that your credentials are valid and a connection can be established with Docker Hub. When finished click OK.
The Command setting will be build so we can leave the default as is as well as the Dockerfile setting which will use the Dockerfile in the root mlnetazdevopssample directory.
Finally, we'll configure the Image name setting. The convention we'll use is <docker-hub-username>/<image-name>. In my case, lqdev is my Docker Hub username and I'll name my image mlnetazdevopssample resulting in lqdev/mlnetazdevopssample. Additionally, check the Include latest tag checkbox to have every build be the latest as opposed to tagging it with versions numbers.
Remember to save and comment the recent changes to the pipeline.
7. Push Docker Image to Docker Hub
The last step in our CI pipeline is to push our newly built image to Docker Hub. To do so we'll use anoter Docker task.
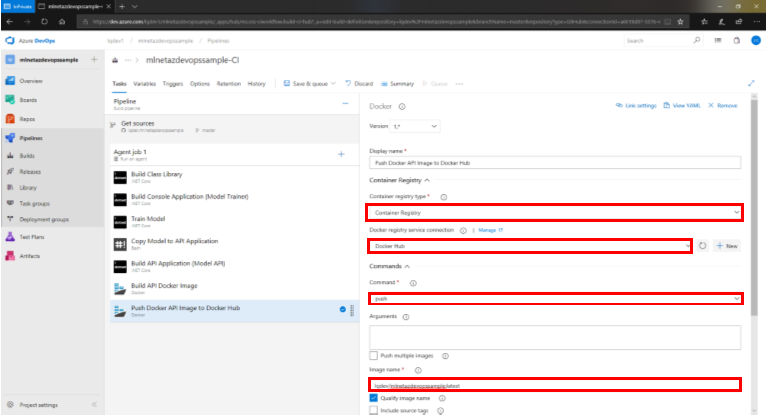
Like in the previous task, we'll set the Container registry type to Container Registry. Set the Docker registry service connection to the most recently created connection by selecting it from the dropdown. We'll be changing our Command to push and set the Image name to the name of the image built in the previous step. The naming convention is <docker-hub-username>/<image-name>:latest. The latest tag was added by our previous Docker build task so make sure that you include it in this task.
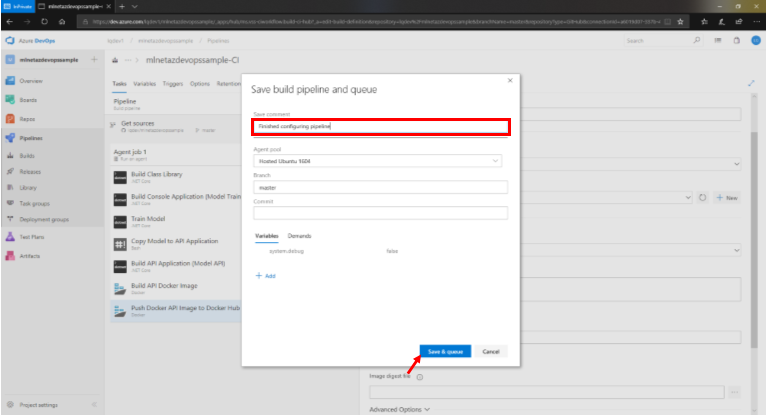
Once finished, click Save & Queue → Save & Queue. As opposed to only clicking Save, this action will manually trigger the CI pipeline.
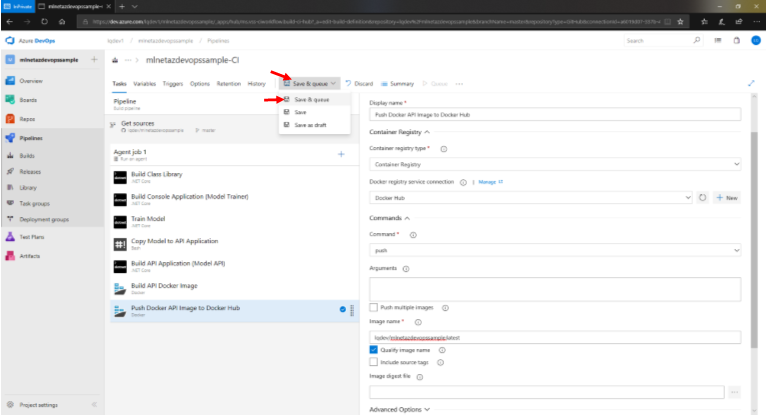
Don't forget to comment your changes and click Save & queue to kick off the CI pipeline.
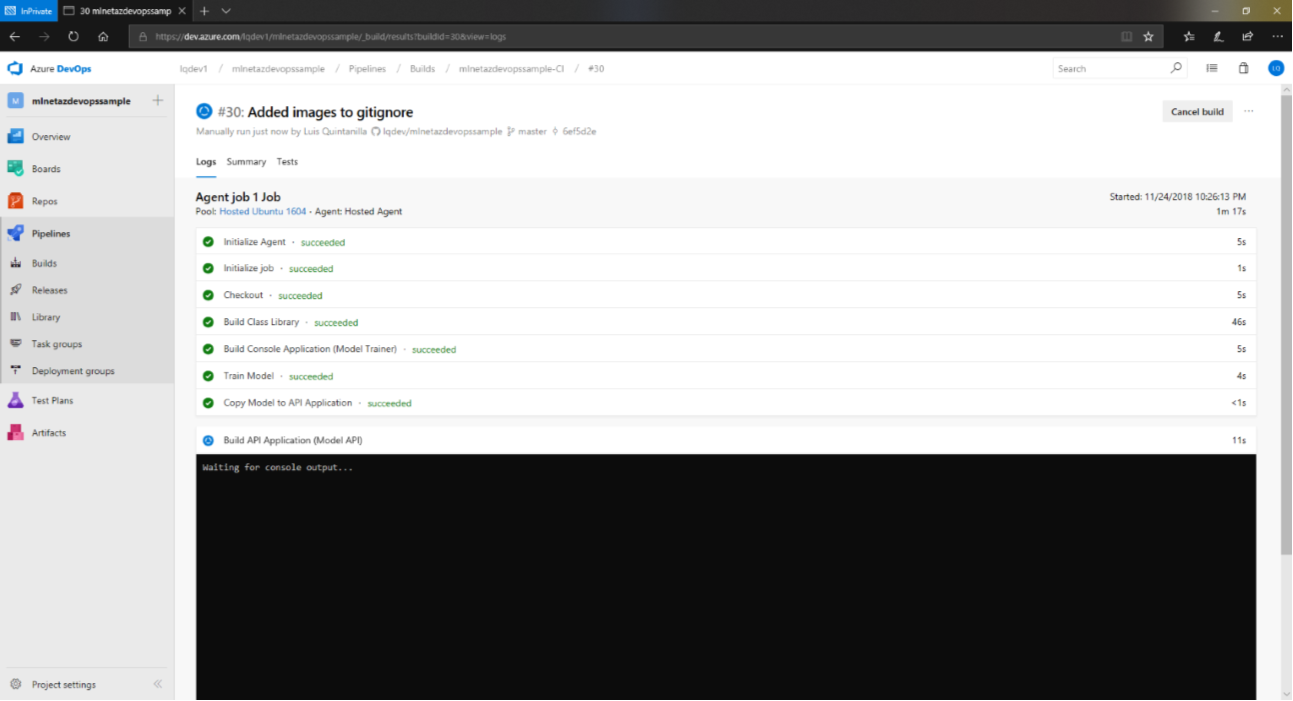
Monitoring the Build
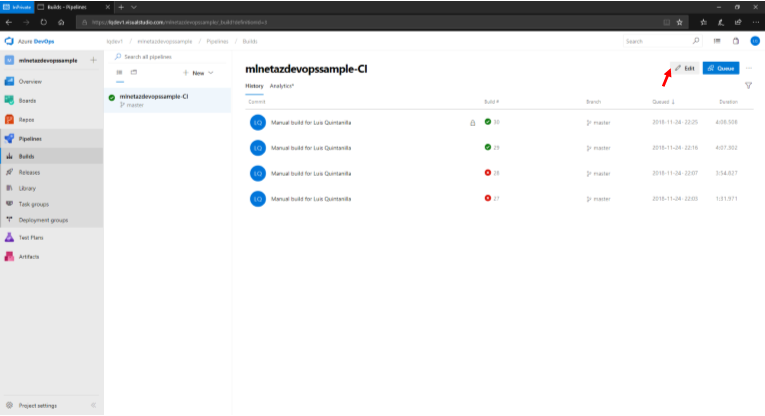
When the build starts, you can click on Builds under the Pipelines section on the left pane.
Select the first build from the list to get more details on the build.

This will take you to the logs which show the status of the pipeline near real-time.
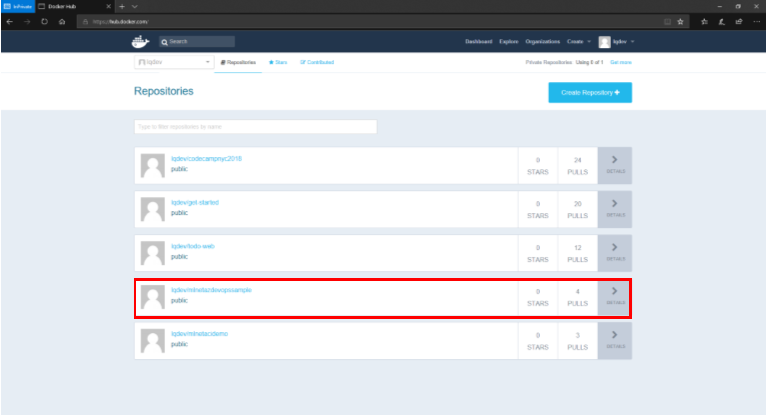
Confirming CI Pipeline Success
If the build is successful, navigate to https://hub.docker.com/ to check whether the Docker image was pushed to the registry.
The Continuous Delivery (CD) Pipeline
Now that we have our CI pipeline set up which will build and package our application, it's time to deploy it. We could do this ourselves or automate it using a CD pipeline. Our application wil be deployed to Azure Container Instances which is an Azure service that offers a quick way to run containers without having to worry about the management of virtual machines or orchestration services. The steps involved in our CD pipeline are the following:
- Create Azure Resource Group for deployment
- Deploy application to Azure Container Instances.
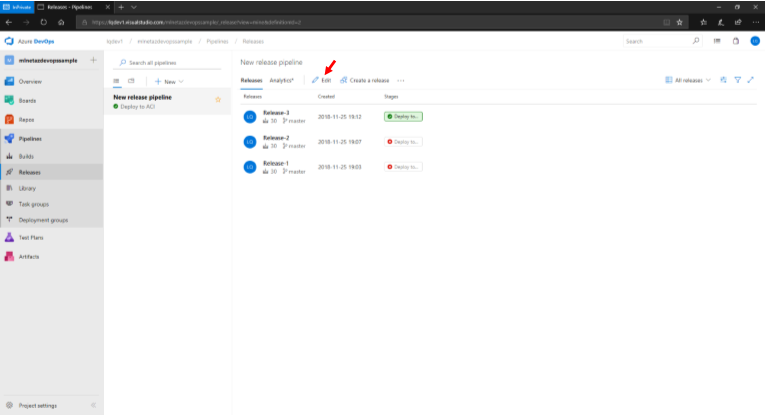
CD Pipeline Setup
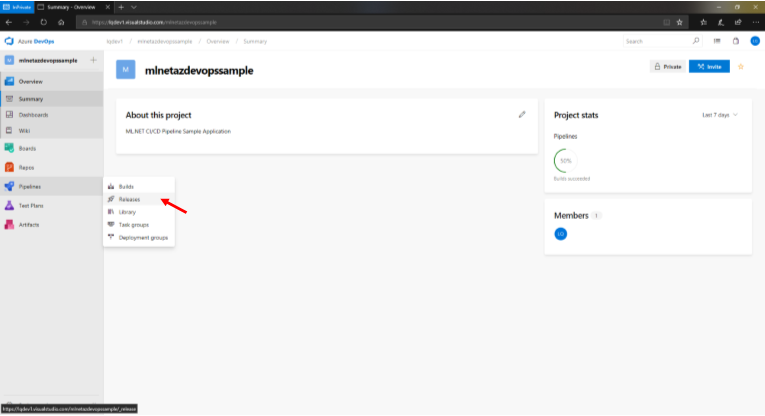
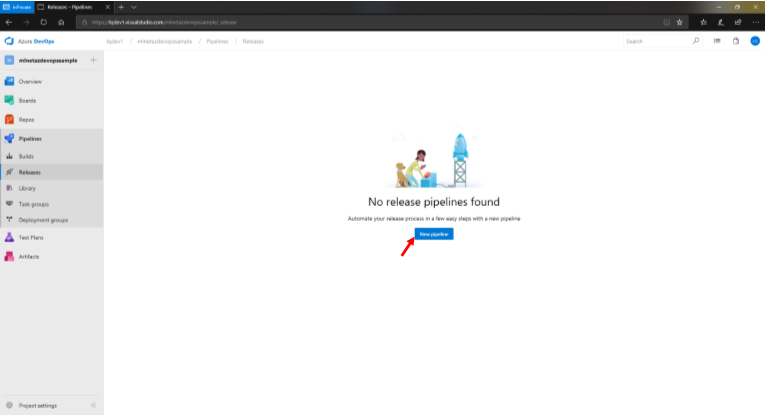
To get started setting up a CD pipeline, from the Azure DevOps project main page, hover over Pipelines and click on Releases.
Once in that page, click on New pipeline.
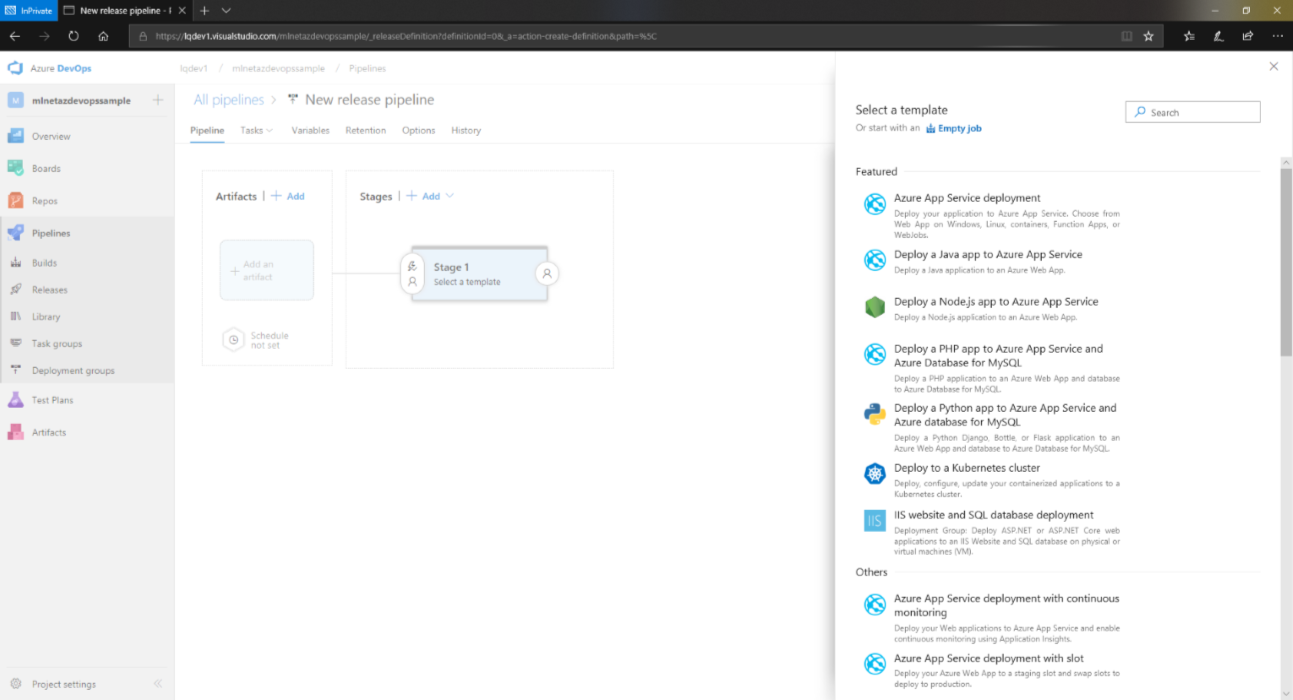
As with our CI pipeline, we'll start off with an Empty Job which we'll configure at a later time.
Triggering Deployments
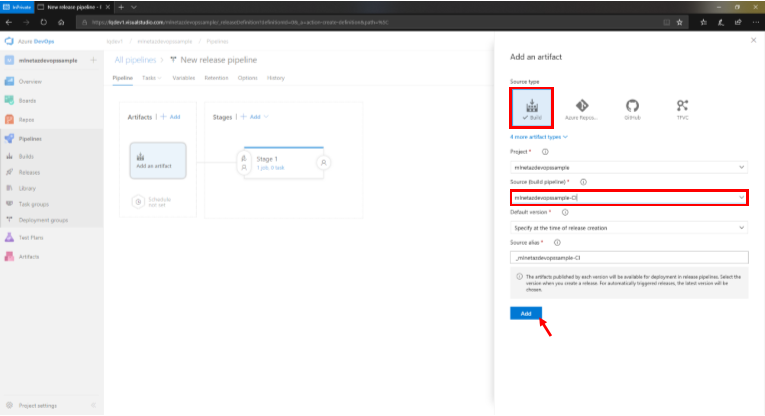
Once our pipeline is created, it's time to configure it. The first thing we'll want to do is add an artifact. An artifact can be a variety of things including the output of our build pipeline. In our case, the end our CI pipeline will be the trigger for our CD pipeline. To add an artifact, click Add an artifact.

In the configuration form, set the Source type to Build and the Source to the name of the CI pipeline created in the previous steps. When finished, click Add.
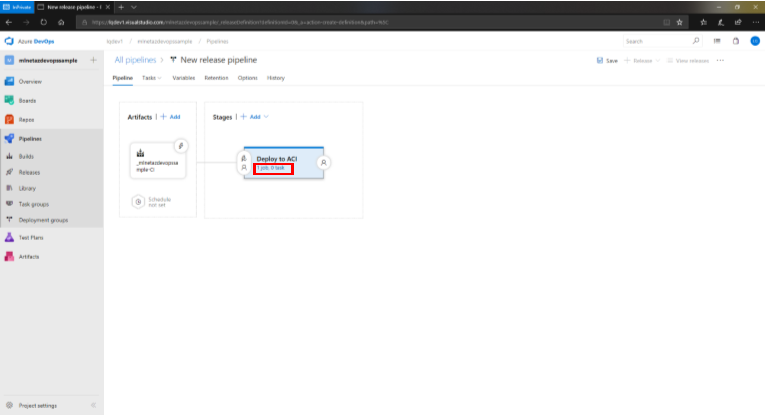
After configuring our artifact, it's time to configure the steps in the CD pipeline. To do so, click on the Stage 1 option in the Stages section of the release pipeline page and change the name to something more descriptive.
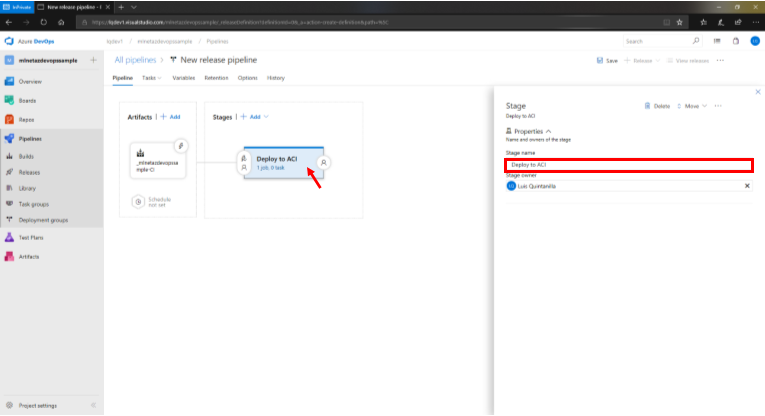
When finished, close out the form and click on the hyperlink below the stage title.
You should now be on a page similar to the CI pipeline job configuration page. On this page, we'll want to click on the Agent Job panel to set the Agent pool setting to Hosted Ubuntu 1604.
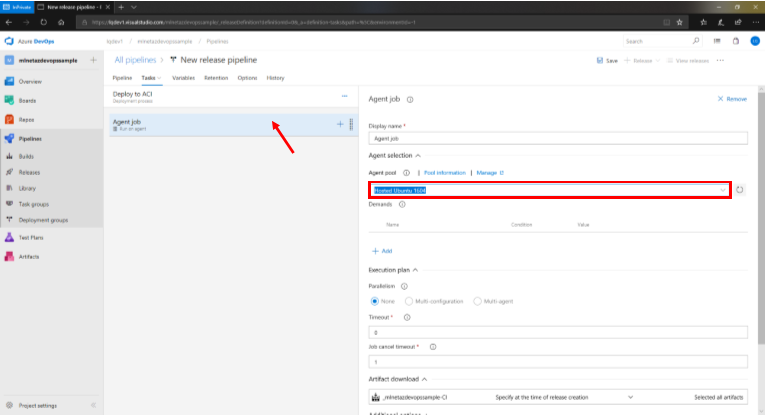
Once that is complete, it's time to configure the tasks in the CD pipeline.
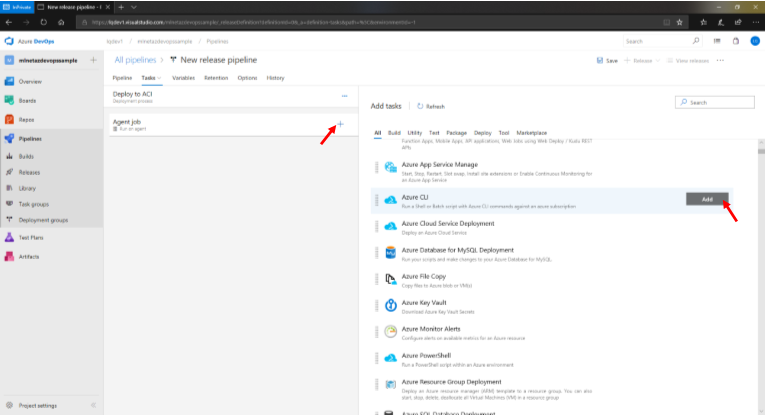
1. Create Azure Resource Group
Start off adding an Azure CLI task to the pipeline. In this task we'll create a resource group in Azure to which we'll deploy our application to.
Before doing anything else, link DevOps to an Azure Subscription by selecting one from the dropdown and clicking Authorize which will prompt you to authenticate your subscription.
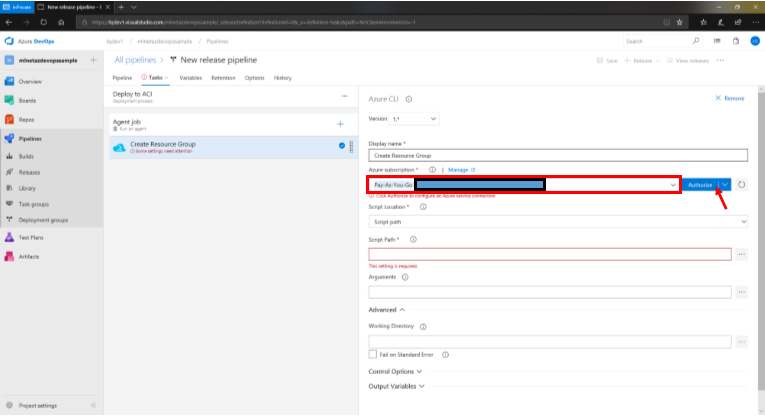
Once an Azure subscription has been linked, let's change the Script Location setting to Inline Script.
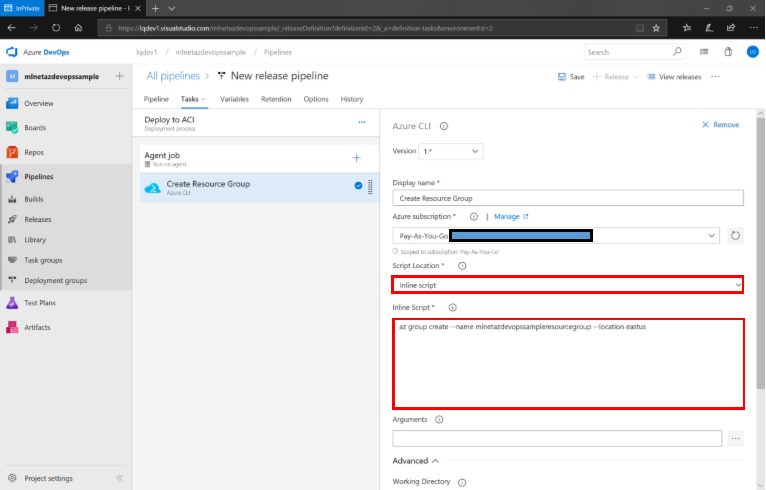
In the Inline Script text box enter the following:
az group create --name mlnetazdevopssampleresourcegroup --location eastus
This script will create a resource group in Azure called mlnetazdevopssampleresourcegroup that is located in eastus. Both of these are configurable to your preference.
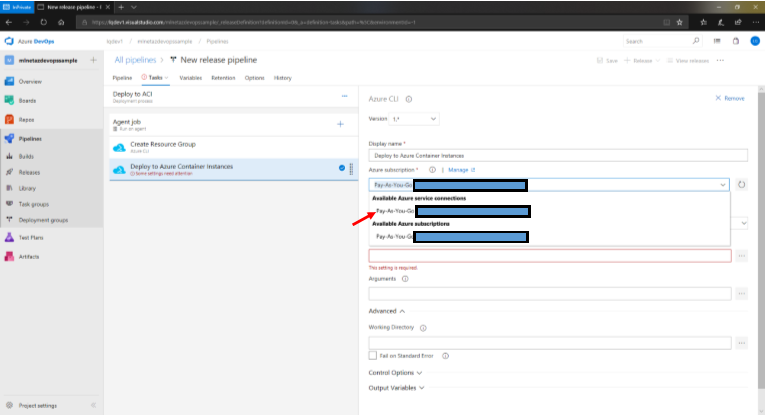
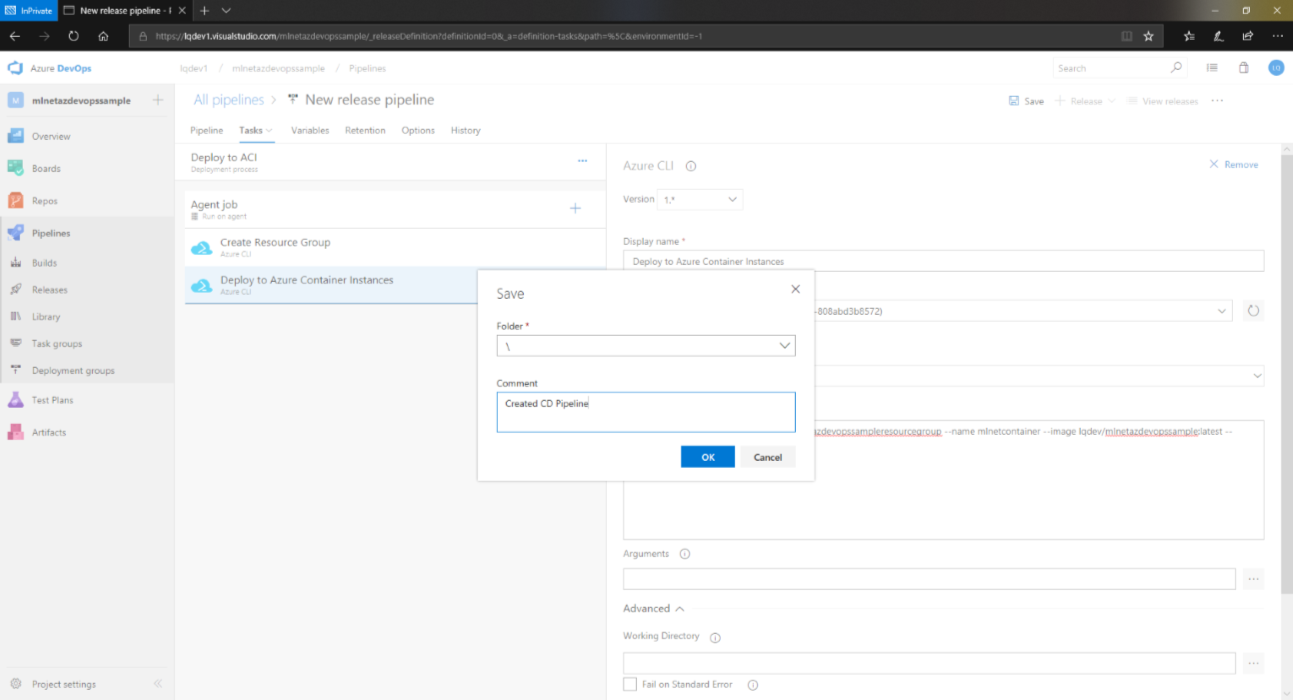
2. Deploy Docker Image to Azure Container Instances
The next and final step in our CD pipeline is the deployment to Azure Container Instances. To deploy our application, we'll add another Azure CLI task. This time, since we already configured our Azure subscription in the previous task, we can select the service connection as opposed to a subscription from the dropdown.
Like in the previous task, our script will be inline.
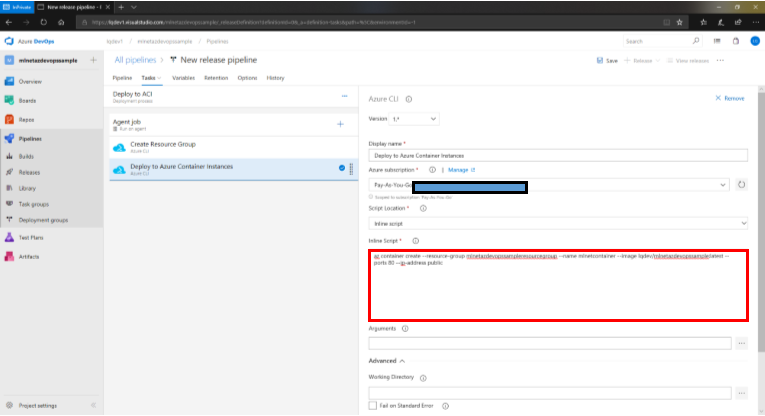
In the Inline Script text box enter the following:
az container create --resource-group mlnetazdevopssampleresourcegroup --name mlnetcontainer --image lqdev/mlnetazdevopssample:latest --ports 80 --ip-address public
This script creates a container in the resource group created by the previous task of the pipeline with the name mlnetcontainer from the Docker image that was pushed to Docker Hub by the CI pipeline. Additionally, it opens up port 80 and assigns a publicly accessible IP address for the container to be accessed externally.
Once this step has been configured, make sure to save and comment all your changes by clicking Save.
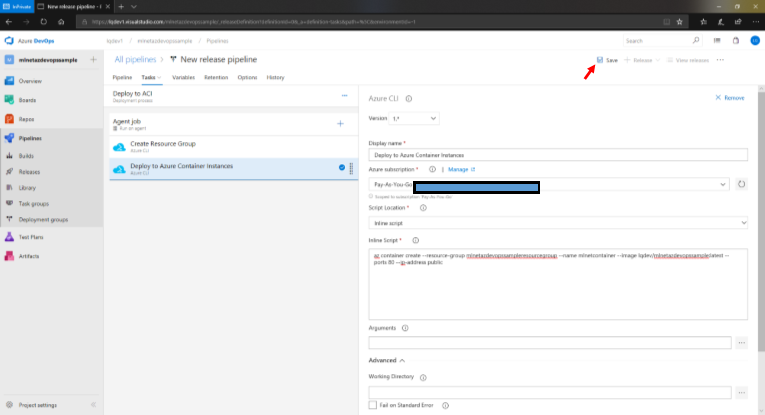
Then, to make it easily recognizable, edit the name of the pipeline by hovering near New release pipeline and clicking on the pencil icon.
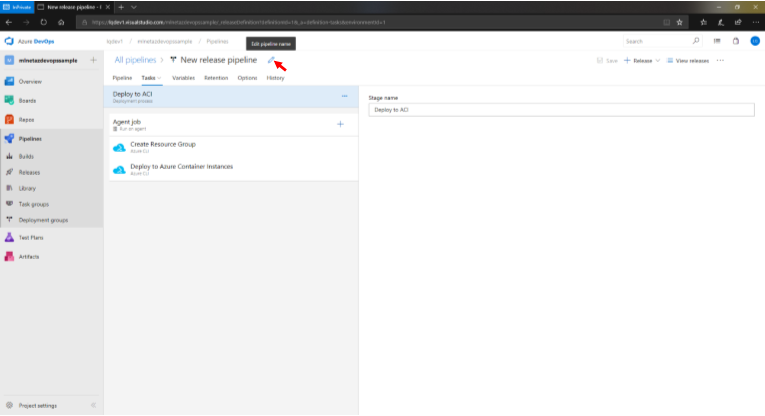
Make sure to save and comment your changes.
Automating CI/CD Pipelines
In the previous steps, we configured CI and CD pipelines. However, we have still not fully automated the triggers that kick off both of these.
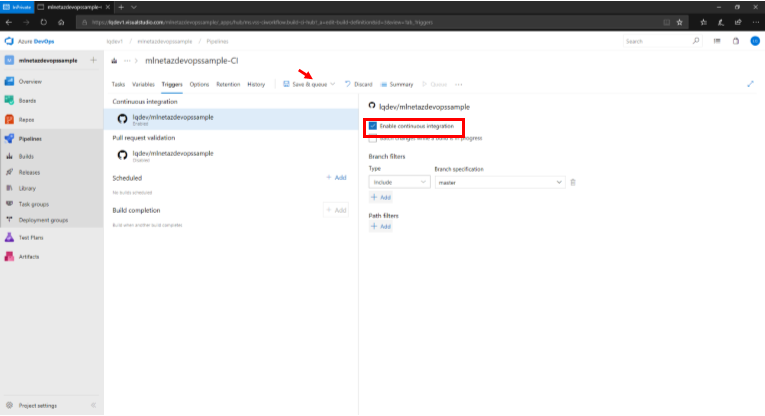
CI Pipeline Trigger
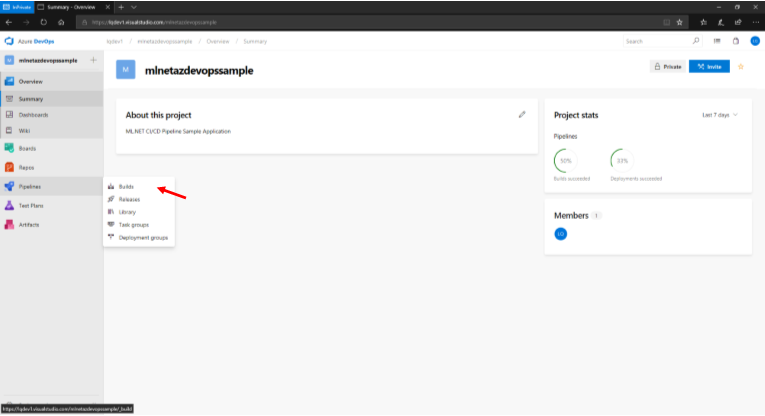
First, lets start off by automating the CI pipeline. To do so, go the project's main page, hover over Pipelines and click on Builds.
This will take you to the CI pipeline page. While on this page, click Edit.
Then, click on Triggers.
Once on this page, check the Enable continous integration checkbox and save and comment your changes by clicking Save & Queue → Save.
CD Pipeline Trigger
To automate the CD pipeline trigger, click on Releases under the Pipelines page to automate the CD pipeline.
Once on the CD pipeline's page, click Edit.
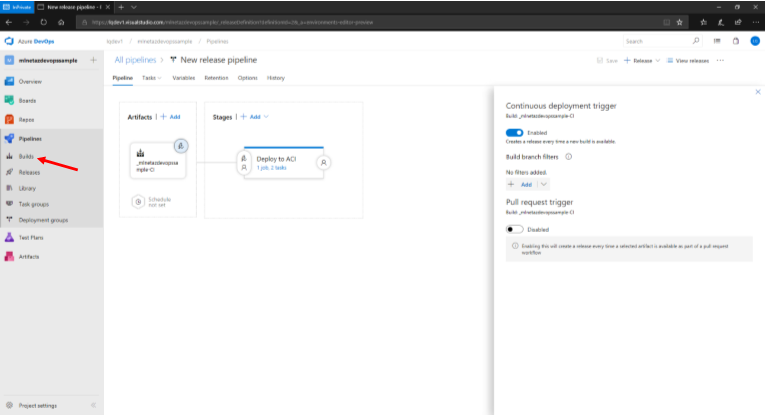
Then, click on the lightning icon in the Artifacts section which will show a configuration form. In this form, toggle the Continuous deployment trigger setting to Enabled.

When finished, save and comment your changes.
Running CI/CD Pipelines
Although going forward builds and deployments will be started when new changes are checked into the master branch of the mlnetazdevopssample repository, for demonstration purposes we will manually kick off the CI/CD pipelines we have just configured. To do so, click on Builds under the Pipelines section on the left pane.
From the CI pipeline page click Queue.

This will prompt a modal to show up in which you can just click Queue to start the build.
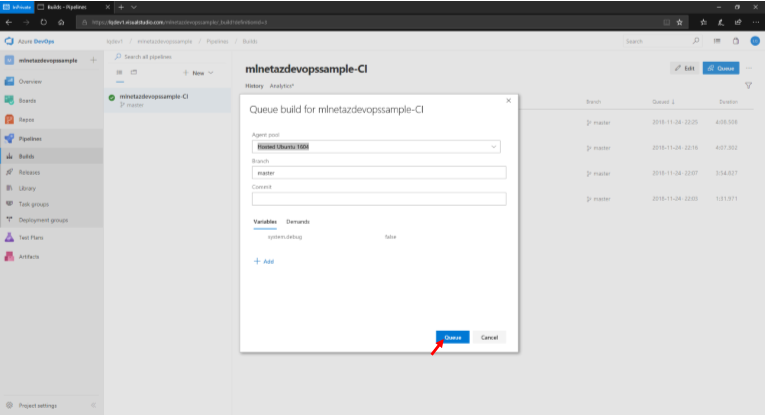
This will kick off a new CI build which subsequently will also kick off the CD pipeline of your application.
Testing The Deployment
If all is successful, a Docker image of an ASP.NET Core Web API application will be deployed to Azure Container Instances which can be accessed via a public IP address.
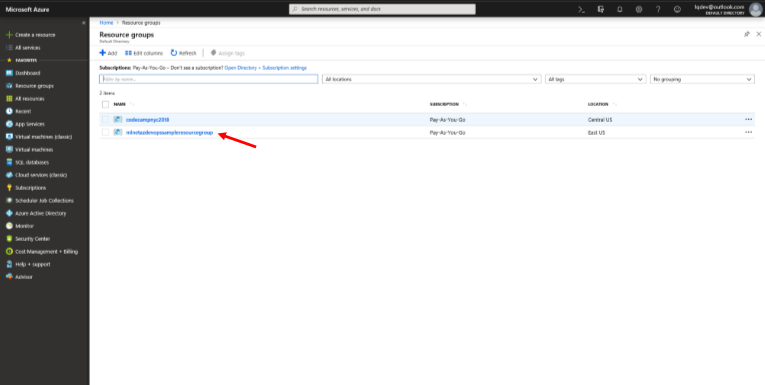
To see whether the deployment worked, navigate to https://portal.azure.com/ and click on Resource groups.
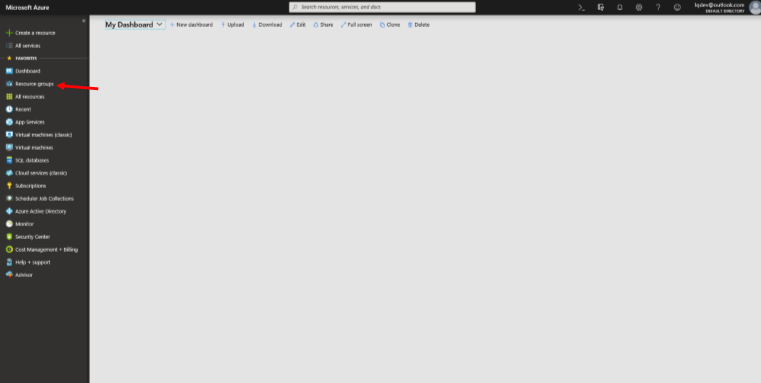
At this point, you should see the resource group that was created by the CD pipeline. If that's the case, click on it.
This will then show a page that displays the container that was deployed to this resource group. Click on that.
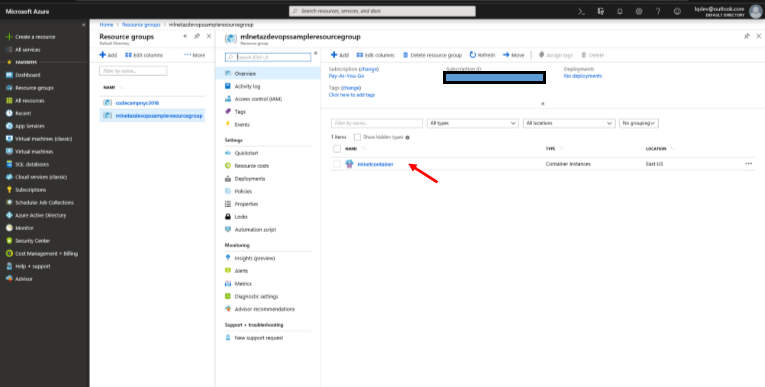
The container page will display diagnostic and configuration information about the container. The information we're interested in is the IP address. Hover to the right of it and click on the icon that says Click to copy. This will copy the address to the clipboard.

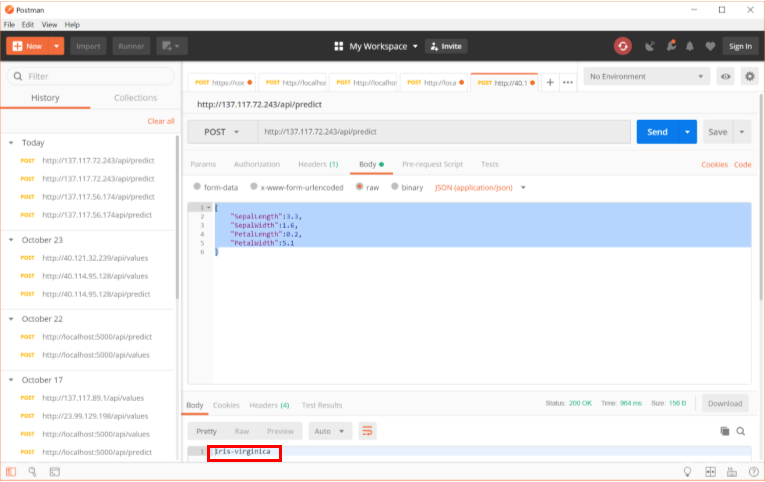
In an application like Postman or Insomnia, make an HTTP POST request to http://<ip-address>/api/predict where ip-address is the public IP address of the container in Azure with the following body.
{
    "SepalLength":3.3,
    "SepalWidth":1.6,
    "PetalLength":0.2,
    "PetalWidth":5.1
}
If successful, the response will be Iris-virginica.
Conclusion
In this writeup, we operationalized the building, packaging and deployment of an ML.NET application that predicts the class of an Iris flower using a variety of mesurements with Azure DevOps. We created both a Continous Integration as well as a Continous Delivery pipeline which deploys the Docker image of an ASP.NET Core Web API to Azure Container Instances. Keep in mind this is just one way of doing it and Azure DevOps is flexible in how all of these tasks and workflows are configured to meet your requirements. Happy coding!