Introduction
There are many ways of deploying machine learning models. The most common way to do so is by exposing models as a web service through APIs or serverless functions. One of the considerations when deploying a model as a web service is latency and performance. The process of making predictions over HTTP using a model involves accepting the user input, loading the serialized version of the model from a file, using the model to make a prediction, and returning the prediction back to the user. Since models are typically just static files, another way of deploying a model is as a static asset over the web, just like any other HTML, CSS, or JavaScript file. This deployment method is similar to that of TensorFlow.js. Deploying in this way has several advantages. One advantage is that there is no longer a web service just to serve the model, making it more cost-efficient. Another advantage is that once the model has been downloaded onto the user's PC, the resources used at that point are those of the user's PC rather than the server the model would otherwise be hosted in. Finally, because the model is a static file, it can be distributed via CDNs.
One of the challenges with this is that machine learning models are usually built using languages other than JavaScript. This makes using the same code / library the model was built difficult or nearly impossible. WebAssembly is changing that by allowing Rust, C++, C# and other languages to run natively inside the browser. Having that ability, the code / logic to load the model and make predictions is much easier and almost comparable to that of a native platform. Blazor WebAssembly provides users the ability to create modern component-based web applications completely in C#. Additionally, Blazor WebAssembly allows users to publish and deploy their applications as static websites in an easy and cost-efficient way. ML.NET is an open-source, cross-platform framework that allows developers to create machine learning models using .NET. In this post, I'll show how to train a multiclass classification machine learning model that predicts iris flower species. Then, I'll take that model and deploy it alongside a Blazor WebAssembly static website to Azure Storage. The full code for this application may be found at the MLNETBlazorWASMSample repository on GitHub.
Prerequisites
This project was built on a Windows PC but should work cross platform on Mac and Linux.
Set up the solution
The solution built in this post contains three projects:
- SchemaLibrary: C# .NET Standard 2.0 class library that contains the schema definition classes of the data used to train the model as well as the prediction output generated by the model.
- TrainingConsole: C# .NET Core 3.1 console application used to train the machine learning model.
- BlazorWebApp: Blazor WebAssembly web application to make predictions using machine learning model trained by TrainingConsole application.
Install Blazor WebAssembly Template
Use the .NET CLI to run the following command in the command prompt:
dotnet new -i Microsoft.AspNetCore.Blazor.Templates::3.2.0-preview1.20073.1
Create the solution
Create a new directory for the solution called MLNETBlazorWASMSample.
mkdir MLNETBlazorWASMSample
Navigate to the newly created solution directory and create a solution:
cd MLNETBlazorWASMSample
dotnet new sln
Create schema class library
The data schema for the model input and output are shared during training as well as when making predictions. To share resources, create a class library that's shared by the ConsoleTraining and BlazorWebApp projects. In the solution directory, enter the following command:
dotnet new classlib -o SchemaLibrary
Install the Microsoft.ML NuGet package (This solution is built with version 1.4.0). The Microsoft.ML package is used throughout the entire solution.
dotnet add SchemaLibrary package Microsoft.ML
Add the library project to the solution.
dotnet sln add SchemaLibrary
Create the training console application
The console application contains the series of data transformations and algorithms used to train the model. In the solution directory, create a new console application.
dotnet new console -o TrainingConsole
Add the console application to the solution.
dotnet sln add TrainingConsole
Reference the SchemaLibrary project.
dotnet add TrainingConsole reference SchemaLibrary
Create the Blazor WebAssembly web application
The web application contains a few input elements so users can provide new data that the model then uses to make predictions. In the solution directory, create a new Blazor WebAssembly application.
dotnet new blazorwasm -o BlazorWebApp
Add the web application project to the solution.
dotnet sln add BlazorWebApp
Reference the SchemaLibrary project.
dotnet add BlazorWebApp reference SchemaLibrary
Define the schema
Understand the data
The data used to train the model comes from the iris dataset. It contains four numerical columns which are sepal and petal measurements and one numerical column for the species of iris flower. This is a sample of the data.
| Sepal length (cm) | Sepal width (cm) | Petal length (cm) | Petal width (cm) | Class (iris species) |
|---|---|---|---|---|
| 5.1 | 3.5 | 1.4 | 0.2 | Iris-setosa |
| 7.0 | 3.2 | 4.7 | 1.4 | Iris-versicolor |
| 6.3 | 3.3 | 6.0 | 2.5 | Iris-virginica |
Define model input schema
In the SchemaLibrary project, create a class called ModelInput to model the data used for training and as model input.
ni ModelInput.cs
The ModelInput class should look like the following:
using Microsoft.ML.Data;

namespace SchemaLibrary
{
    public class ModelInput
    {
        [LoadColumn(0)]
        public float SepalLength { get; set; }

        [LoadColumn(1)]
        public float SepalWidth { get; set; }

        [LoadColumn(2)]
        public float PetalLength { get; set; }

        [LoadColumn(3)]
        public float PetalWidth { get; set; }

        [LoadColumn(4)]
        public string Label { get; set; }
    }
}
Notice that the Class column is now a property called Label. This is for two reasons:
- Avoid using the
classkeyword. - In ML.NET, the default column name of the column to predict expected by algorithms is
Label.
Also notice the LoadColumn attributes at the top of each property. This is used to tell the loader the index of the column where the data for the respective property is.
Define model output schema
Similar to the input schema, there's a schema for the output of the model. The type of model used in this solution is a multiclass classification model since there are more than two categories to choose from for iris flower species. Multiclass classification models output a column called PredictedLabel which contains the name of the predicted category. In the SchemaLibrary project, create a class called ModelOutput to model the predictions made by the model.
ni ModelOutput.cs
The ModelOutput class should look like the following:
namespace SchemaLibrary
{
    public class ModelOutput
    {
        public string PredictedLabel { get; set; }
    }
}
Train the model
Now it's time to create the application that trains the model.
Get the data
Download the data and save it inside the TrainingConsole project directory.
curl https://archive.ics.uci.edu/ml/machine-learning-databases/iris/iris.data -o iris.data
Define the data preparation and training steps
In the TrainingConsole project, open the Program.cs file and add the following using statements at the top:
using System;
using System.Linq;
using Microsoft.ML;
using SchemaLibrary;
Then, delete the contents inside the Main method and replace it with the following.
// 1. Initialize MLContext
MLContext mlContext = new MLContext();

// 2. Load the data
IDataView data = mlContext.Data.LoadFromTextFile<ModelInput>("iris.data", separatorChar:',');

// 3. Shuffle the data
IDataView shuffledData = mlContext.Data.ShuffleRows(data);

// 3. Define the data preparation and training pipeline.
IEstimator<ITransformer> pipeline =
    mlContext.Transforms.Concatenate("Features","SepalLength","SepalWidth","PetalLength","PetalWidth")
        .Append(mlContext.Transforms.NormalizeMinMax("Features"))
        .Append(mlContext.Transforms.Conversion.MapValueToKey("Label"))
        .Append(mlContext.MulticlassClassification.Trainers.NaiveBayes())
        .Append(mlContext.Transforms.Conversion.MapKeyToValue("PredictedLabel"));

// 4. Train with cross-validation
var cvResults = mlContext.MulticlassClassification.CrossValidate(shuffledData, pipeline);

// 5. Get the highest performing model and its accuracy
(ITransformer, double) model =
    cvResults
        .OrderByDescending(fold => fold.Metrics.MacroAccuracy)
        .Select(fold => (fold.Model, fold.Metrics.MacroAccuracy))
        .First();

Console.WriteLine($"Top performing model's macro-accuracy: {model.Item2}");

// 6. Save the model
mlContext.Model.Save(model.Item1, data.Schema, "model.zip");

Console.WriteLine("Model trained");
The training application loads the data from the iris.data file and applies a series of transformations. First, all of the individual numerical columns are combined into a single vector and stored in a new column called Features. The Features column is then normalized and the MapValueToKey transform is used to convert the text in the Label column to a number. Then, the transformed data is used to train a model using the NaiveBayes algorithm. Note that at the time of this writing, for multiclass classification problems, only Naive Bayes has been confirmed to work with Blazor WebAssembly. Finally, the PredictedLabel is stored as a number so it has to be converted back into text.
Using the Fit method, the data is applied to the pipeline. Because the dataset is small, a technique called cross-validation is used to build a more robust model. Once the model is trained, the model with the top performance is then serialized and saved to a file called model.zip for later use in the web application.
The final Program.cs file should look like the content below:
using System;
using System.Linq;
using Microsoft.ML;
using SchemaLibrary;

namespace TrainingConsole
{
    class Program
    {
        static void Main(string[] args)
        {
            // 1. Initialize MLContext
            MLContext mlContext = new MLContext();

            // 2. Load the data
            IDataView data = mlContext.Data.LoadFromTextFile<ModelInput>("iris.data", separatorChar:',');

            // 3. Shuffle the data
            IDataView shuffledData = mlContext.Data.ShuffleRows(data);

            // 3. Define the data preparation and training pipeline.
            IEstimator<ITransformer> pipeline =
                mlContext.Transforms.Concatenate("Features","SepalLength","SepalWidth","PetalLength","PetalWidth")
                    .Append(mlContext.Transforms.NormalizeMinMax("Features"))
                    .Append(mlContext.Transforms.Conversion.MapValueToKey("Label"))
                    .Append(mlContext.MulticlassClassification.Trainers.NaiveBayes())
                    .Append(mlContext.Transforms.Conversion.MapKeyToValue("PredictedLabel"));

            // 4. Train with cross-validation
            var cvResults = mlContext.MulticlassClassification.CrossValidate(shuffledData, pipeline);

            // 5. Get the highest performing model and its accuracy
            (ITransformer, double) model =
                cvResults
                    .OrderByDescending(fold => fold.Metrics.MacroAccuracy)
                    .Select(fold => (fold.Model, fold.Metrics.MacroAccuracy))
                    .First();

            Console.WriteLine($"Top performing model's macro-accuracy: {model.Item2}");

            // 6. Save the model
            mlContext.Model.Save(model.Item1, data.Schema, "model.zip");

            Console.WriteLine("Model trained");
        }
    }
}
Run the application
In the TrainConsole project directory, use the following command to run the application and train the model:
dotnet run
Host the model
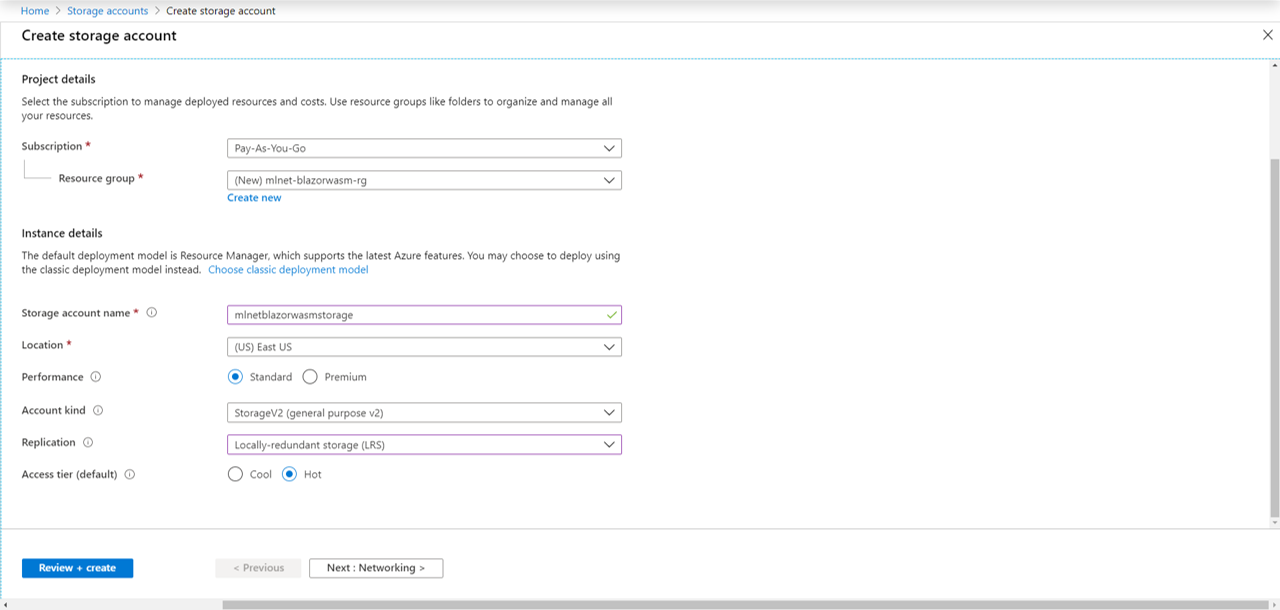
Once you have the model saved, use the Azure Portal to create an Azure Storage account.
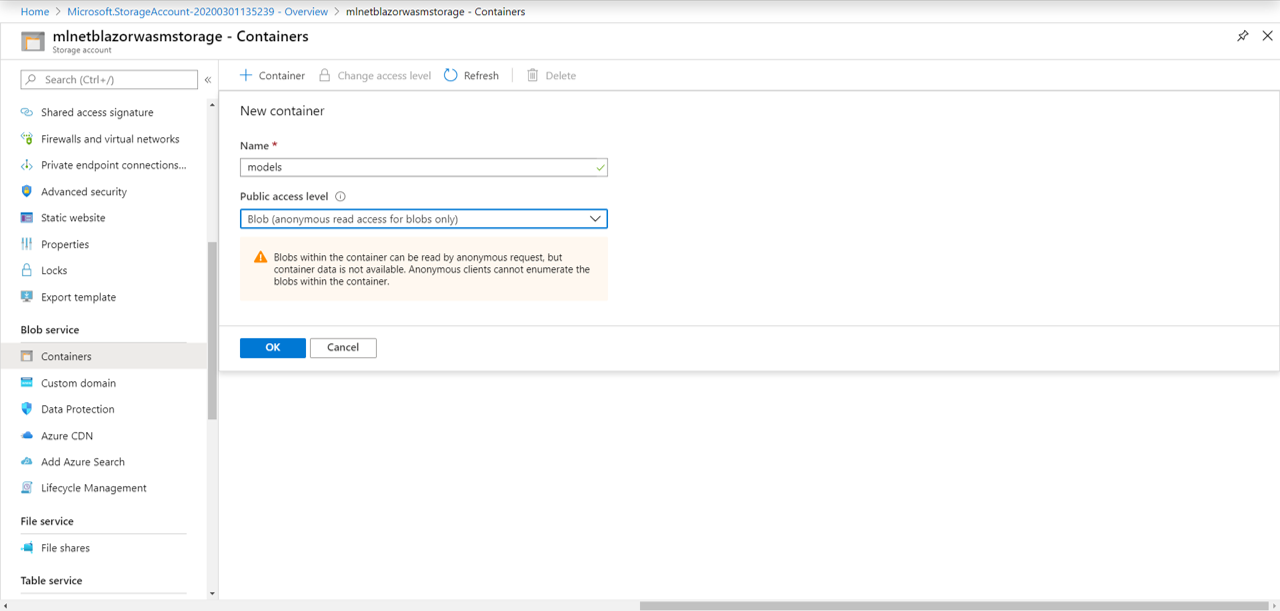
Then, navigate to your newly created storage account resource and create a blob container called models.
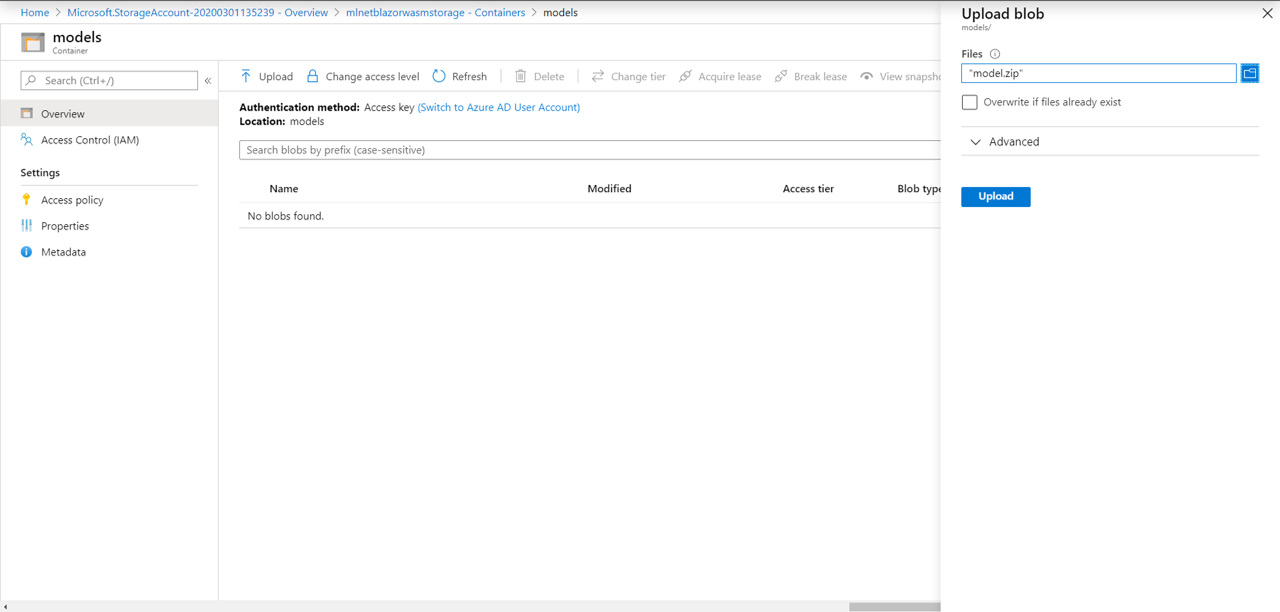
Once your container is created, navigate to it and upload the model.zip file.
Create prediction web page
To make predictions, create a web page to take in user input. Then, provide the user input to the model and display the prediction to the user.
Set up imports
In the BlazorWebApp project directory, open the _Imports.razor file. This contains the using statements for the pages and components in your application. Add the following using statements:
@using System.IO
@using Microsoft.ML
@using SchemaLibrary
Create user input page
In the BlazorWebApp project, create a new razor page called Prediction.razor inside the Pages directory.
ni Prediction.razor
Add the following content to it:
@page "/prediction"
@inject HttpClient _client

<label>Sepal Length: </label>
<input type="text" @bind="_sepalLength"><br>
<label>Sepal Width: </label>
<input type="text" @bind="_sepalWidth"><br>
<label>Petal Length: </label>
<input type="text" @bind="_petalLength"><br>
<label>Petal Width: </label>
<input type="text" @bind="_petalWidth"><br>
<button @onclick="GetPrediction">Make prediction</button>
@if(@ModelPrediction == null)
{
    <p>Enter data to get a prediction</p>
} else
{
    <p>@ModelPrediction</p>
}


@code {
    private PredictionEngine<ModelInput,ModelOutput> _predictionEngine;
    private string _sepalLength, _sepalWidth, _petalLength, _petalWidth, ModelPrediction;

    protected override async Task OnInitializedAsync()
    {
        Stream savedModel = await _client.GetStreamAsync("<YOUR-MODEL-ENDPOINT>");
        MLContext mlContext = new MLContext();
        ITransformer _model = mlContext.Model.Load(savedModel,out DataViewSchema schema);
        _predictionEngine = mlContext.Model.CreatePredictionEngine<ModelInput,ModelOutput>(_model);
    }

    private void GetPrediction()
    {
        ModelInput input = new ModelInput
        {
            SepalLength=float.Parse(_sepalLength),
            SepalWidth=float.Parse(_sepalWidth),
            PetalLength=float.Parse(_petalLength),
            PetalWidth=float.Parse(_petalWidth)
        };

        ModelOutput prediction = _predictionEngine.Predict(input);

        ModelPrediction = prediction.PredictedLabel;
    }
}
The Predict.razor page contains a text input element for each of the columns the model was original trained on. When the page is initialized, the model is loaded from Azure Storage and a PredictionEngine is created. Make sure to replace <YOUR-MODEL-ENDPOINT> with the URL of the blob that contains your model.zip. A PredictionEngine is a convenience API to make a single prediction. Traditionally when models are served as a web service, it is recommended to use the PredictionEnginePool service because it's thread-safe and more performant in multi-threaded application. However, in this case since the model is downloaded onto the individual user's browser, it's okay to use PredictionEngine. After a user enters input values and clicks the "Make Prediction" button, the GetPrediction method executes by taking the user input and making a prediction using the PredictionEngine. The prediction is then displayed in the browser.
Add to navigation menu
In the BlazorWebApp project, open the NavMenu.razor file in the Shared directory.
Add the following list item to the <ul> element.
<li class="nav-item px-3">
    <NavLink class="nav-link" href="prediction">
        <span class="oi oi-list-rich" aria-hidden="true"></span> Prediction
    </NavLink>
</li>
The final NavMenu.razor page should look like the following:
<div class="top-row pl-4 navbar navbar-dark">
    <a class="navbar-brand" href="">BlazorWebApp</a>
    <button class="navbar-toggler" @onclick="ToggleNavMenu">
        <span class="navbar-toggler-icon"></span>
    </button>
</div>

<div class="@NavMenuCssClass" @onclick="ToggleNavMenu">
    <ul class="nav flex-column">
        <li class="nav-item px-3">
            <NavLink class="nav-link" href="" Match="NavLinkMatch.All">
                <span class="oi oi-home" aria-hidden="true"></span> Home
            </NavLink>
        </li>
        <li class="nav-item px-3">
            <NavLink class="nav-link" href="counter">
                <span class="oi oi-plus" aria-hidden="true"></span> Counter
            </NavLink>
        </li>
        <li class="nav-item px-3">
            <NavLink class="nav-link" href="fetchdata">
                <span class="oi oi-list-rich" aria-hidden="true"></span> Fetch data
            </NavLink>
        </li>
        <li class="nav-item px-3">
            <NavLink class="nav-link" href="prediction">
                <span class="oi oi-list-rich" aria-hidden="true"></span> Prediction
            </NavLink>
        </li>
    </ul>
</div>

@code {
    private bool collapseNavMenu = true;

    private string NavMenuCssClass => collapseNavMenu ? "collapse" : null;

    private void ToggleNavMenu()
    {
        collapseNavMenu = !collapseNavMenu;
    }
}
Configure the web application
The web application will he hosted as a static site on Azure Storage.
In the Azure Portal, navigate to the storage account resource where you are hosting your model.
Enable static website
Enable a static website for the storage account and set the index document name and error document path to index.html.
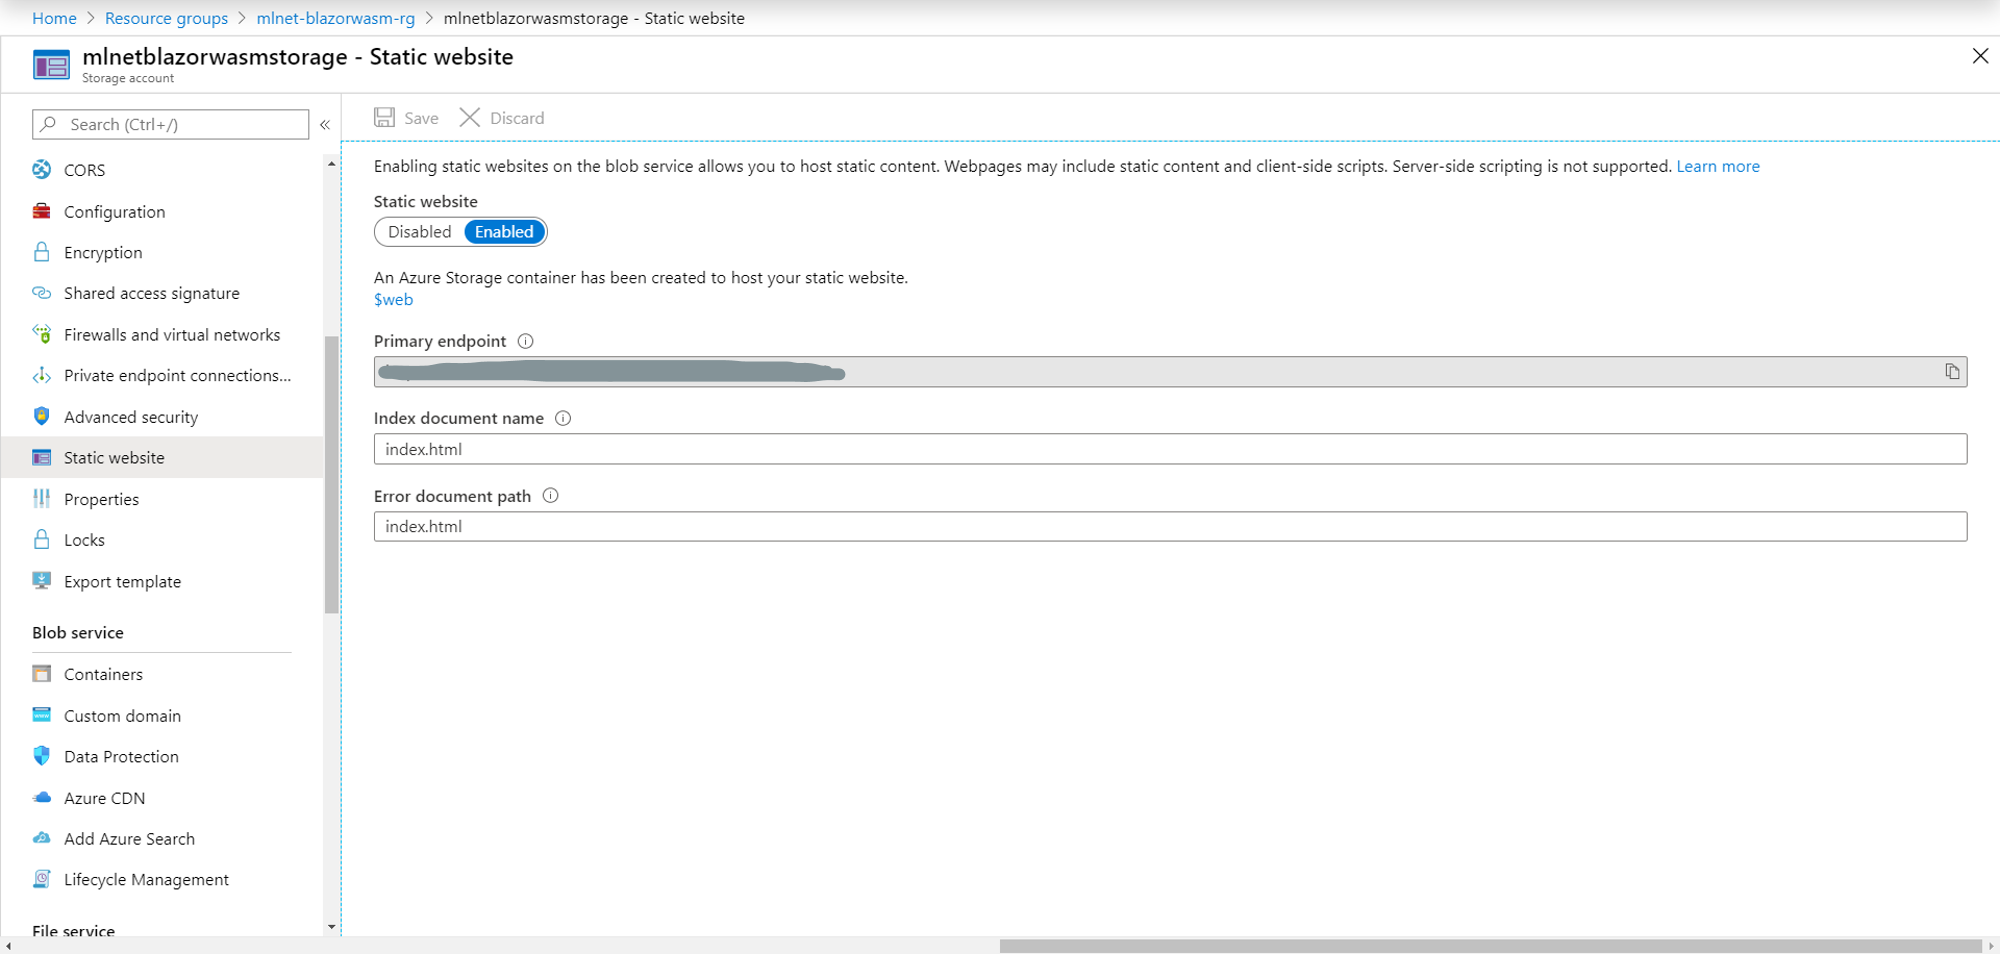
At this point, a new container called $web is created in your storage account. This is where all your site's static files will reside. Additionally, a primary endpoint is created. This is the URL you will use to access your application
Configure CORS
The storage account has some default CORS settings. In order to download and use your model from your application, you'll have to configure them.
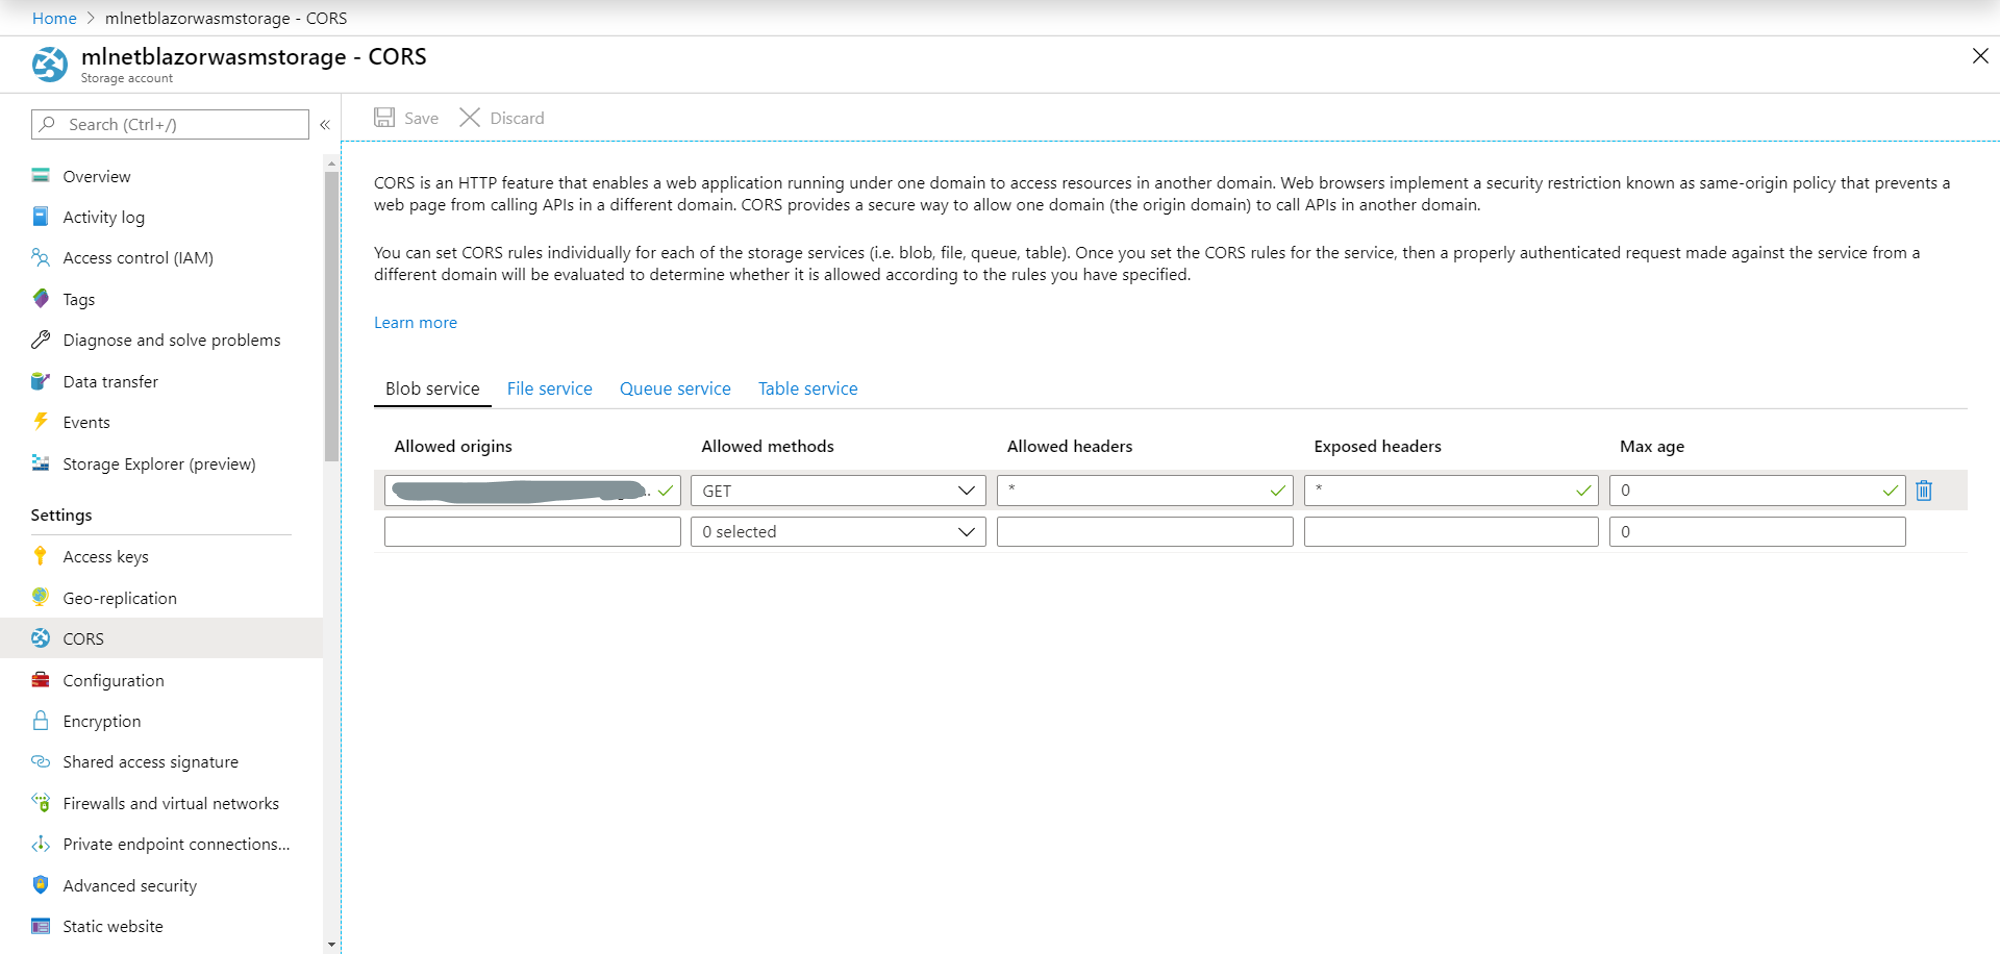
For "Allowed origins", enter your primary endpoint.
Publish and deploy the web application
To publish your application, run the following command:
dotnet publish -c Release
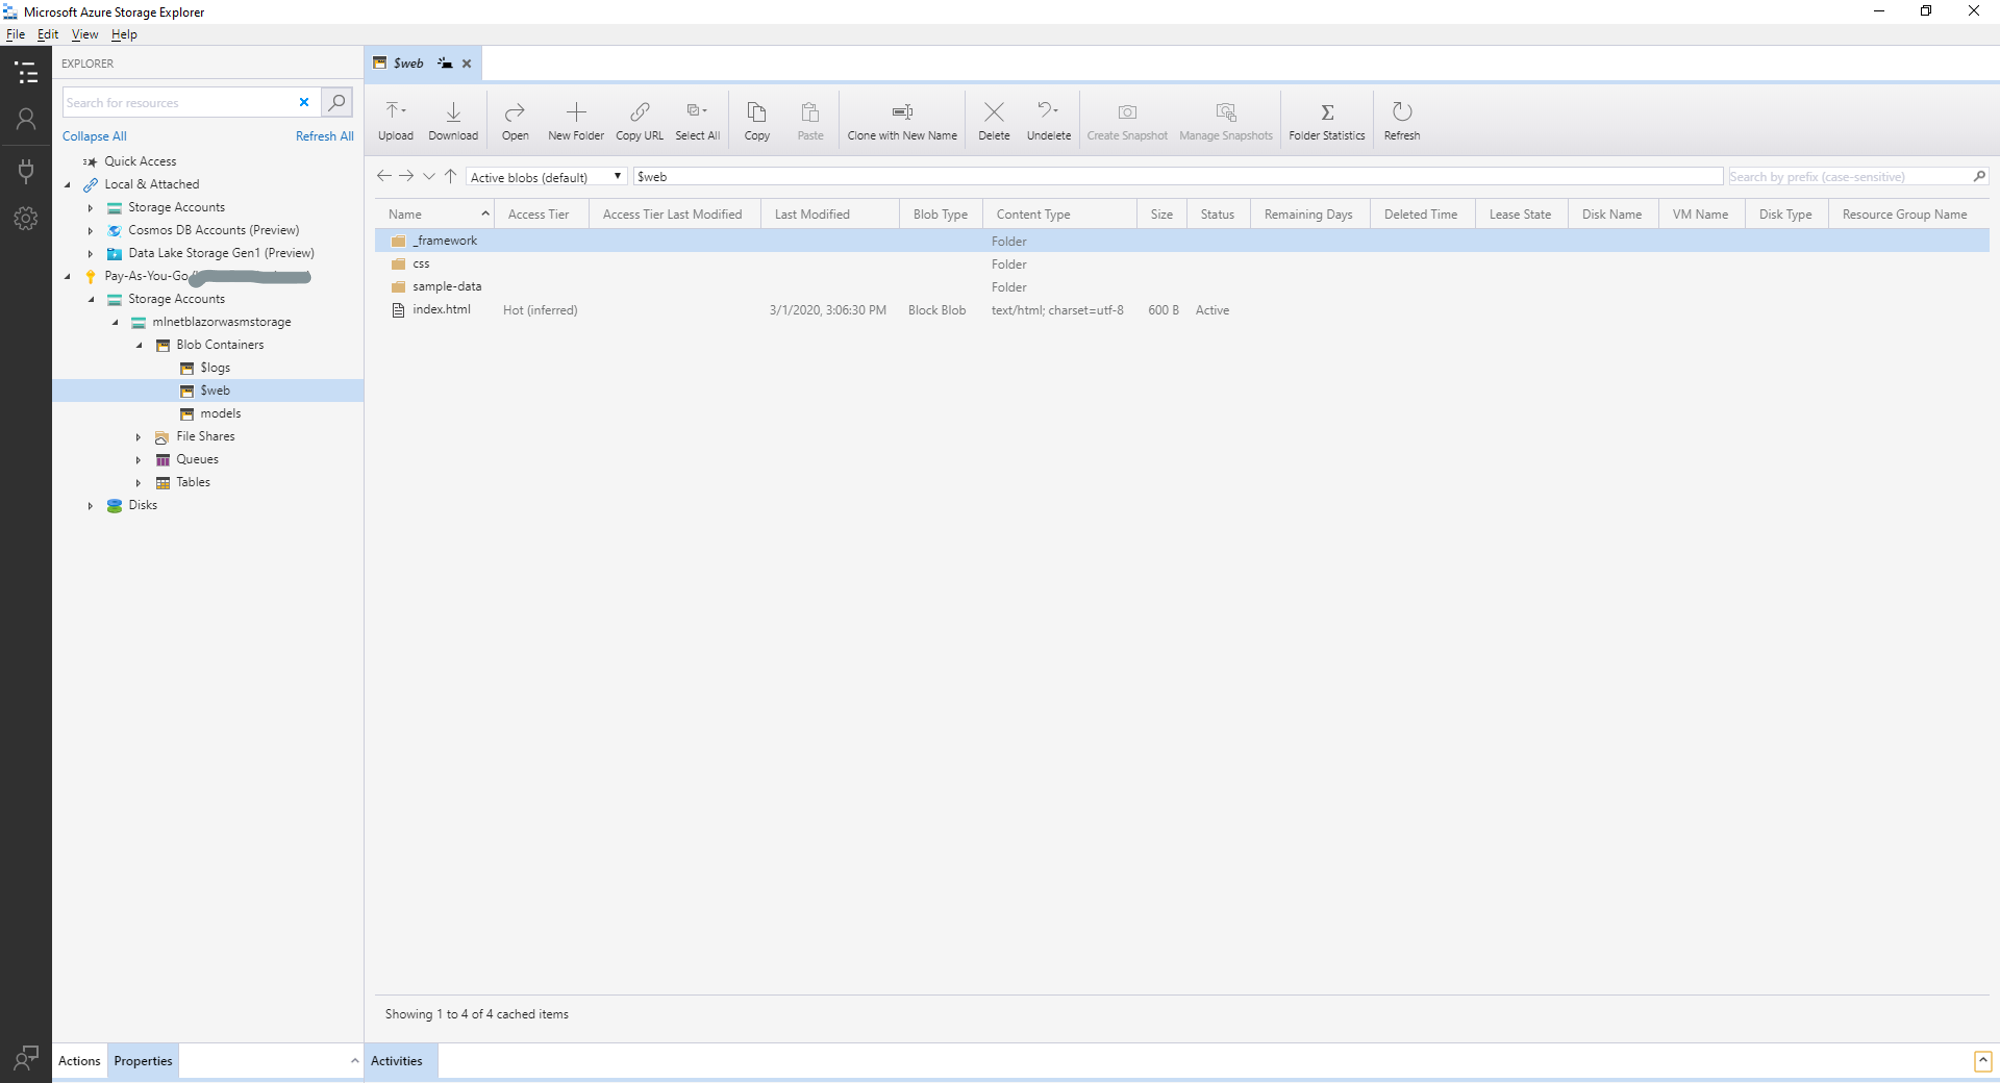
This generates all the files you'll need to host your web application as a static site in the bin/Release/netstandard2.1/publish/BlazorWebApp/dist directory of your BlazorWebApp project.
To deploy your application, use Azure Storage Explorer to copy all of the files in the dist directory into the $web container of your Azure Storage Account.
Test the application
In your browser, navigate to your static website's primary endpoint and select the Prediction page. Input data and click "Make prediction". The page should look as follows.
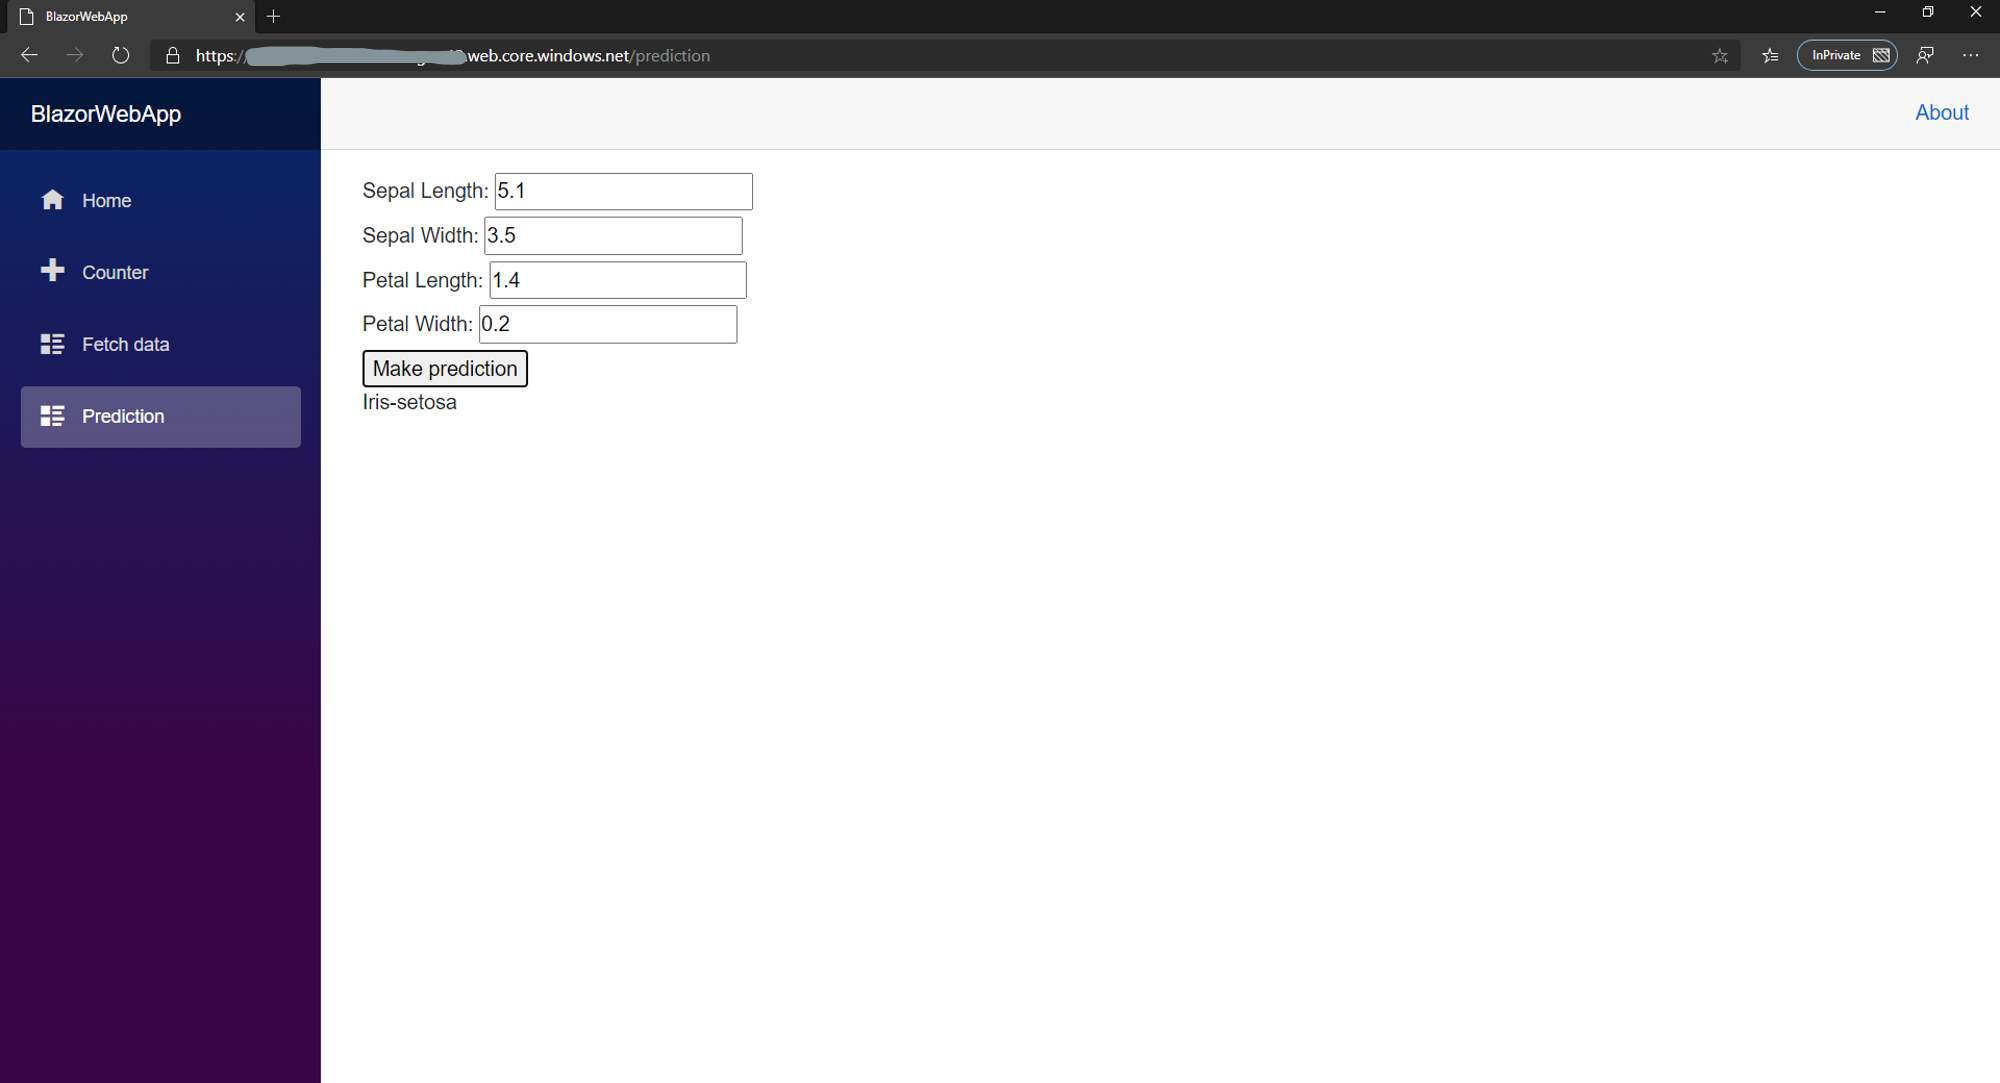
You may note that performance of Naive Bayes on this dataset is not the best so some of the predictions may not be as accurate. I am okay with this at the moment because this is a proof-of-concept to show how these technologies might work together. Perhaps using a better dataset may yield better results.
Conclusion
In this post, I went over how to deploy an ML.NET multiclass classification model alongside a Blazor WebAssembly static website to Azure Storage. While more limited than other methods of deployment due to the early stages of WebAssembly and Blazor WebAssembly, this shows the possibilities for the technologies. Deploying in this manner reduces the amount of resources required to deploy these models and shifts processing from a server or web service to the client's browser making deployment and distribution of machine learning models more efficient, scalable and cost-efficient.