Introduction
A few months ago, I saw VS Code released an update that had Emmet abbreviations built in. At the time, I saw a demo and it looked like an interesting tool but I knew very little about it. This past week, while practicing css and scaffolding a blog-like web page for practice I decided to give Emmet a try. After reading some of the documentation and trying it out, within five minutes I was able to replicate what I had done manually with one line of "code". The entire process is described below.
What We'll Build
Displayed below is the scaffold of the webpage I built. As it can be seen, in the body element there is a nav element and four div elements that will contain our articles and their metadata.
<html>
<head>
    <title></title>
    <link rel="stylesheet" href="">
</head>
<body>
    <nav>
        <ul>
            <li class="nav-item"></li>
            <li class="nav-item"></li>
            <li class="nav-item"></li>
        </ul>
    </nav>
    <div>
        <div class="article">
            <h2 class="article-title"></h2>
            <h6 class="article-date"></h6>
            <p class="article-description"></p>
        </div>
    </div>
    <div>
        <div class="article">
            <h2 class="article-title"></h2>
            <h6 class="article-date"></h6>
            <p class="article-description"></p>
        </div>
    </div>
    <div>
        <div class="article">
            <h2 class="article-title"></h2>
            <h6 class="article-date"></h6>
            <p class="article-description"></p>
        </div>
    </div>
    <div>
        <div class="article">
            <h2 class="article-title"></h2>
            <h6 class="article-date"></h6>
            <p class="article-description"></p>
        </div>
    </div>
</body>
</html>
How We'll Build It
The hmtl above can be programatically built using the abbreviation below.
html>(head>title+link)+(body>(nav>ul>li.nav-item*3)+(div>div.article>h2.article-title+h6.article-date+p.article-description)*4
To break down some of the things that are going on here, we can start with the syntax. The > character denotes that the item on the left is the parent of the item(s) on the right. Similarly, the + character is used to describe siblings. Similar to math operations, parentheses evaluate what's inside them. Elements themselves can contain additional data such as class names and ids. This data can be appended to the element name just like css with . for classes and # for ids.
With that knowledge, we can see that we have an html root element with head and body children. The head element has a title and link child elements. The body element has a nav element with a ul child which contains three li elements. The nav element has a div sibling which contains four div children that serve as the containers for our articles and their metadata.
Adding some style
To help visualize what the page looks like we can add some css.
* {
    margin: 0;
}

nav {
    padding: 0;
    background-color: black;
    color: white;
}

.nav-item {
    margin: 20px;
    display: inline-block;
    font-weight: bold;
    font-size: 20px;
}

.nav-item:hover {
    opacity: 0.7;
}

.article {
    display: block;
    margin: 20px;
    padding-left: 5px;
    background-color: lightgray;
    border: black solid 2px;
}

.article-title {
    display: block;
    font-family: serif;
    font-size: 30px;
    text-decoration: underline;
    display: inline;
}

.article-date {
    font-size: 20px;
    font-family: fantasy;
    float: right;
    margin-right: 5px;
}

.article-description {
    display: block;
    font-size: 18px;
    font-family: sans-serif;
    margin-top: 5px;
}
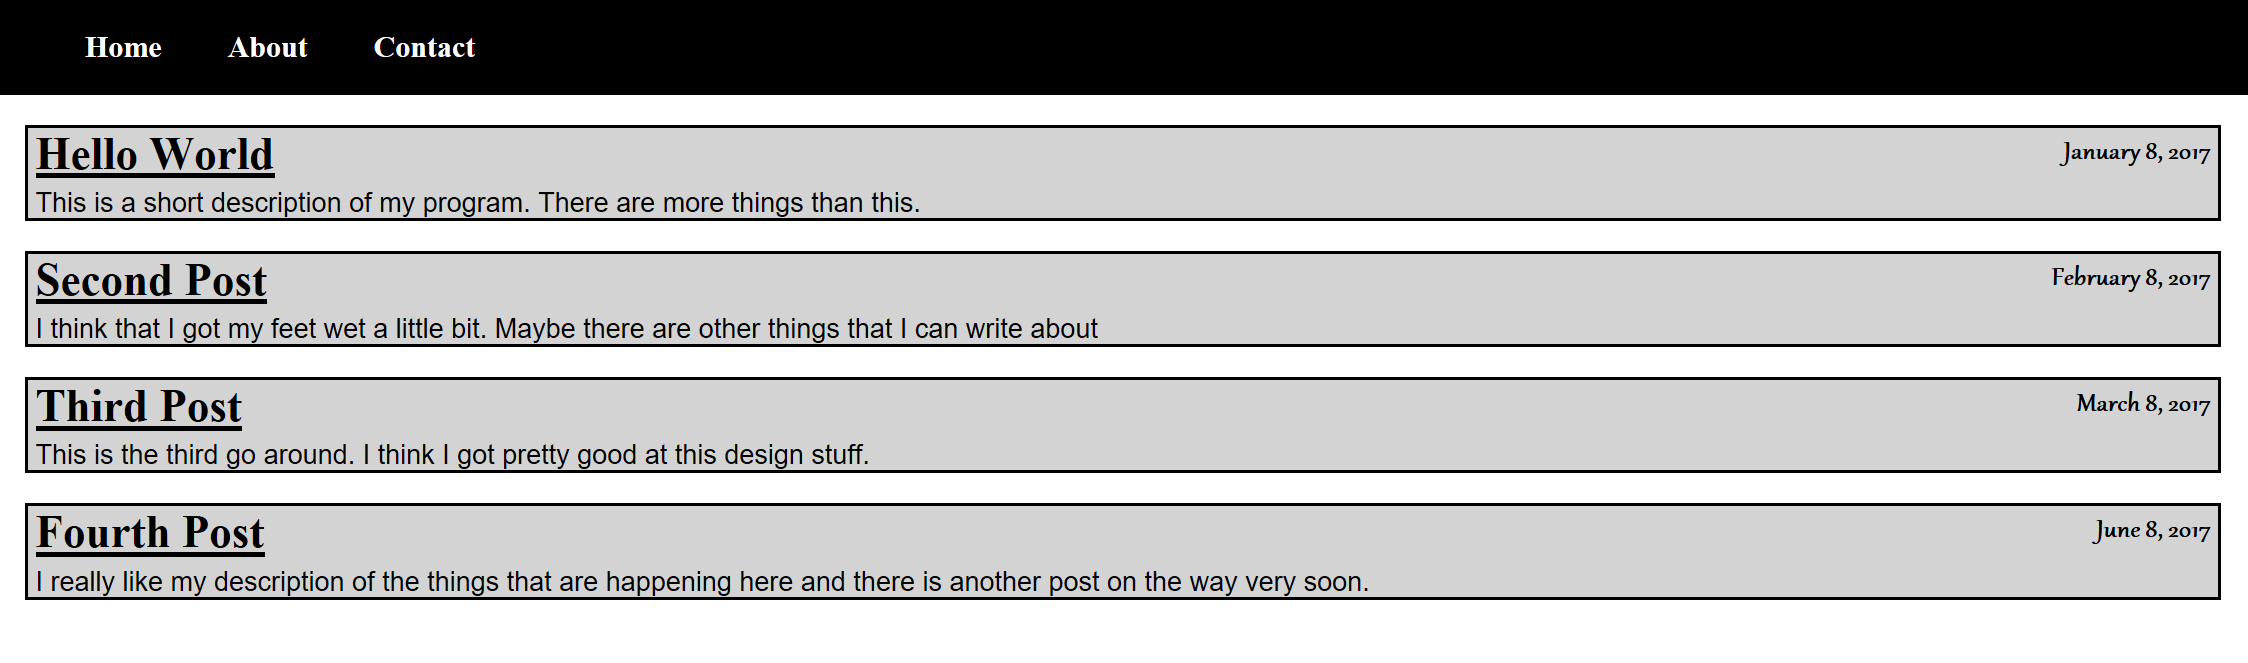
Result
After linking our css with the webpage as well as adding some content to the page, the result will look as follows.
<html>
    <head>
        <link rel="stylesheet" type="text/css" href="main.css"/>
        <title>HTML CSS Practice</title>
    </head>
    <body>
        <nav>
            <ul>
                <li class="nav-item">Home</li>
                <li class="nav-item">About</li>
                <li class="nav-item">Contact</li>
            </ul>
        </nav>
        <div>
            <div class="article">
                <h2 class="article-title">Hello World</h2>
                <h6 class="article-date">January 8, 2017</h6>
                <p class="article-description">This is a short description of my program. There are more things than this.</p>
            </div>
            <div class="article">
                <h2 class="article-title">Second Post</h2>
                <h6 class="article-date">February 8, 2017</h6>
                <p class="article-description">I think that I got my feet wet a little bit. Maybe there are other things that I can write about</p>
            </div>
            <div class="article">
                <h2 class="article-title">Third Post</h2>
                <h6 class="article-date">March 8, 2017</h6>
                <p class="article-description">This is the third go around. I think I got pretty good at this design stuff.</p>
            </div>
            <div class="article">
                <h2 class="article-title">Fourth Post</h2>
                <h6 class="article-date">June 8, 2017</h6>
                <p class="article-description">I really like my description of the things that are happening here and there is another post on the way very soon.</p>
            </div>
        </div>
    </body>
</html>