Serverless Machine Learning with ML.NET and Azure Functions
Introduction
In a previous blog post, I explored how to build and deploy machine learning models built with the ML.NET framework using an ASP.NET Core Web API, Docker and Azure Container Instances. While this is certainly a good way to deploy such models especially those that are critical and require high availability and/or consist of long-running processes, it's not the case when those requirements are not needed. In such cases serverless computing makes more sense from a cost and resource utilization standpoint. Therefore, in this blog post I will go over how to train a classification model with ML.NET and deploy it using Azure Functions. Source code for this post can be found at the following link.
Prerequisites
Prior to starting, make sure you have all of the necessary software to build this project. Although this project was built on a system running Ubuntu 16.04 it should work cross-platform.
Set Up Azure Environment
Before writing any code we want to configure our Azure environment. To do so we'll be using the Azure CLI. Although in these examples I am providing the resource group name, storage account name and function application name feel free to use one of your choosing. Naming is not as important for resource group or storage account but definitely is the case for the application.
Fist we want to log into our account using the following command
az login
This will guide you through a series of prompts that will eventually result in you being logged in. To make sure you are logged in you can use the account command.
az account list
The following output should appear if successfull.
[
  {
    "cloudName": "AzureCloud",
    "id": "<YOUR-ID>",
    "isDefault": true,
    "name": "Pay-As-You-Go",
    "state": "Enabled",
    "tenantId": "<YOUR-TENANT-ID>",
    "user": {
      "name": "<YOUR-USERNAME>",
      "type": "user"
    }
  }
]
Next, we want to create a resource group to contain all of our Azure resources for this application.
az group create --name azfnmlnetdemo --location eastus
Once our resource group is created, it's time to start adding resources for it. First we'll add a storage account which will contain our trained model.
az storage account create --name azfnmlnetdemostorage --location eastus --resource-group azfnmlnetdemo --sku Standard_LRS
Then we'll create an Serverless Function Application and link it to our storage account. We'll want to create a unique name for it. An easy way to do so is to add the date to the end of the name of our application (i.e. myappname20180816).
az functionapp create --name azfnmlnetdemo20180821 --storage-account azfnmlnetdemostorage --consumption-plan-location eastus --resource-group azfnmlnetdemo
The final step in the environment setup is to set the runtime of our Serverless Function Application in the Application Settings to beta which supports .NET Core.
az functionapp config appsettings set --name azfnmlnetdemo20180821 --resource-group azfnmlnetdemo --settings FUNCTIONS_EXTENSION_VERSION=beta
Now we're ready to build our machine learning model and upload it to our storage account
Building The Model
Once our environment is set up we can start building our solution. The first step is to create a directory and initialize our solution inside of it.
Set Up The Solution
mkdir azfnmlnetdemo
cd azfnmlnetdemo
dotnet new sln
Create The Model Project
Then we want to create a console project for our model and add it to our solution.
dotnet new console -o model
dotnet sln add model/model.csproj
Add Dependencies
Since we’ll be using the ML.NET framework, we need to add it to our model project.
cd model
dotnet add package Microsoft.ML
dotnet restore
Download The Data
Before we start training the model, we need to download the data we’ll be using to train. We do so by creating a directory called data and downloading the data file onto there.
mkdir data
curl -o data/iris.txt https://archive.ics.uci.edu/ml/machine-learning-databases/iris/iris.data
If we take a look at the data file, it should look something like this:
5.1,3.5,1.4,0.2,Iris-setosa
4.9,3.0,1.4,0.2,Iris-setosa
4.7,3.2,1.3,0.2,Iris-setosa
4.6,3.1,1.5,0.2,Iris-setosa
5.0,3.6,1.4,0.2,Iris-setosa
5.4,3.9,1.7,0.4,Iris-setosa
4.6,3.4,1.4,0.3,Iris-setosa
5.0,3.4,1.5,0.2,Iris-setosa
4.4,2.9,1.4,0.2,Iris-setosa
4.9,3.1,1.5,0.1,Iris-setosa
Train The Model
Now that we have all our dependencies set up, it’s time to train our model. I leveraged the demo that is used on the ML.NET Getting-Started website.
Define Data Structures
In the root directory of our model project, let’s create two classes called IrisData and IrisPrediction which will define our features and predicted attribute respectively. Both of them will use Microsoft.ML.Runtime.Api to add the property attributes.
Here is what our IrisData class looks like:
using Microsoft.ML.Runtime.Api;

namespace model
{
    public class IrisData
    {
        [Column("0")]
        public float SepalLength;

        [Column("1")]
        public float SepalWidth;

        [Column("2")]
        public float PetalLength;

        [Column("3")]
        public float PetalWidth;

        [Column("4")]
        [ColumnName("Label")]
        public string Label;
    }
}
Similarly, here is the IrisPrediction class:
using Microsoft.ML.Runtime.Api;

namespace model
{
    public class IrisPrediction
    {
        [ColumnName("PredictedLabel")]
        public string PredictedLabels;
    }
}
Build the Training Pipeline
The way the ML.NET computations process data is via a sequential pipeline of steps that are performed eventually leading up to the training of the model. Therefore, we can create a class called Model to perform all of these tasks for us.
using Microsoft.ML.Data;
using Microsoft.ML;
using Microsoft.ML.Runtime.Api;
using Microsoft.ML.Trainers;
using Microsoft.ML.Transforms;
using Microsoft.ML.Models;
using System;
using System.Threading.Tasks;

namespace model
{
    class Model
    {

        public static async Task<PredictionModel<IrisData,IrisPrediction>> Train(LearningPipeline pipeline, string dataPath, string modelPath)
        {
            // Load Data
            pipeline.Add(new TextLoader(dataPath).CreateFrom<IrisData>(separator:','));

            // Transform Data
            // Assign numeric values to text in the "Label" column, because
            // only numbers can be processed during model training
            pipeline.Add(new Dictionarizer("Label"));

            // Vectorize Features
            pipeline.Add(new ColumnConcatenator("Features", "SepalLength", "SepalWidth", "PetalLength", "PetalWidth"));

            // Add Learner
            pipeline.Add(new StochasticDualCoordinateAscentClassifier());

            // Convert Label back to text
            pipeline.Add(new PredictedLabelColumnOriginalValueConverter() {PredictedLabelColumn = "PredictedLabel"});

            // Train Model
            var model = pipeline.Train<IrisData,IrisPrediction>();

            // Persist Model
            await model.WriteAsync(modelPath);

            return model;
        }
    }
}
In addition to building our pipeline and training our machine learning model, the Model class also serialized and persisted the model for future use in a file called model.zip.
Test The Model
Now that we have our data structures and model training pipeline set up, it’s time to test everything to make sure it’s working. We’ll put our logic inside of our Program.cs file.
using System;
using Microsoft.ML;

namespace model
{
    class Program
    {
        static void Main(string[] args)
        {

            string dataPath = "model/data/iris.txt";

            string modelPath = "model/model.zip";

            var model = Model.Train(new LearningPipeline(),dataPath,modelPath).Result;

            // Test data for prediction
            var prediction = model.Predict(new IrisData()
            {
                SepalLength = 3.3f,
                SepalWidth = 1.6f,
                PetalLength = 0.2f,
                PetalWidth = 5.1f
            });

            Console.WriteLine($"Predicted flower type is: {prediction.PredictedLabels}");
        }
    }
}
All set to run. We can do so by entering the following command from our solution directory:
dotnet run -p model/model.csproj
Once the application has been run, the following output should display on the console.
Automatically adding a MinMax normalization transform, use 'norm=Warn' or
'norm=No' to turn this behavior off.Using 2 threads to train.
Automatically choosing a check frequency of 2.Auto-tuning parameters: maxIterations = 9998.
Auto-tuning parameters: L2 = 2.667734E-05.
Auto-tuning parameters: L1Threshold (L1/L2) = 0.Using best model from iteration 882.
Not training a calibrator because it is not needed.
Predicted flower type is: Iris-virginica
Additionally, you’ll notice that a file called model.zip was created in the root directory of our model project. This persisted model can now be used outside of our application to make predictions, but first we need to upload it to our Azure Storage account.
Upload The Model
Now that we have a trained model and it has been persisted to the model.zip file, it's time to upload it to Azure Storage so that it is available to our Azure Functions application.
To get started with that, first we need the access keys for our storage account. You can get those by using the following command.
az storage account keys list --account-name azfnmlnetdemostorage --resource-group azfnmlnetdemo
The result of that command should return your primary and secondary keys. You can use either one for the following steps.
Although we can upload directly to the account, it's best to create a container to upload our model to. To keep it simple, I'll call the container models.
az storage container create --name models --account-key <YOUR-ACCOUNT-KEY> --account-name azfnmlnetdemostorage --fail-on-exist
Once our container's created, we can upload our model.zip file to it.
az storage blob upload --container-name models --account-name azfnmlnetdemostorage --file model/model.zip --name model.zip
To verify that the file has been uploaded, you can list the files inside the models storage container.
az storage blob list --container-name models --account-name azfnmlnetdemostorage --output table
That command should produce output similar to that below:
Name       Blob Type    Blob Tier    Length    Content Type     Last Modified              Snapshot
---------  -----------  -----------  --------  ---------------  -------------------------  ----------
model.zip  BlockBlob                 4373      application/zip  2018-08-21T19:26:09+00:00
That's all there is to the upload process. It's now time to build our Azure Functions Application
Build The Azure Functions Application
Initialize Azure Function Project
In our solution directory, we want to create a new directory for our Azure Function project
mkdir serverlessfunctionapp
dotnet sln add serverlessfunctionapp/serverlessfunctionapp.csproj
Then, we can scaffold an Azure Functions project inside our newly created serverlessfunctionapp project directory using Azure Functions Core Tools
cd serverlessfunctionapp
func init
At this point you will be prompted to select the runtime for your application. For this application select dotnet.
This will generate a few files in the serverlessfunctionapp directory. Keep in mind though that this does not create the function.
Add Dependencies
Before we create any functions, we need to add the dependencies for our Azure Functions application. Since we'll be using Microsoft.ML in our Azure Function application, we'll need to add it as a dependency. From the serverlessfunctionapp enter the following command:
dotnet add package Microsoft.ML
dotnet restore
Create Serverless Function
Once we've added the dependencies it's time to create a new function. To do so we'll use the Azure Functions Core Tools new command. Although not required, it's good practice to separate functions and related files into their own directory.
mkdir Predict
cd Predict
func new
At this time you will be prompted to select a template. For our classification model, we'll be using an HttpTrigger which is exactly what it sounds like. An HTTP request is what calls or invokes our function. With that being said, select the HttpTrigger option.
You will then be prompted to enter a name for your function. You can use any name but to make things easy, name it the same as the directory the function is in. Once that process is complete, there should be a file called Predict.cs inside our serverlessfunctionapp/Predict directory. This is where we'll write the logic for our application.
Define Data Structures
We'll also be making use of the IrisData and IrisPrediction classes inside our Predict function. Therefore, we need to create classes for them inside our Predict directory. The content will be the same as when we trained our model with the exception of the namespace which will now be serverlessfunctionapp.Predict. The content of those files should look like the code below:
//IrisData.cs
using Microsoft.ML.Runtime.Api;

namespace serverlessfunctionapp.Predict
{
    public class IrisData
    {
        [Column("0")]
        public float SepalLength;

        [Column("1")]
        public float SepalWidth;

        [Column("2")]
        public float PetalLength;

        [Column("3")]
        public float PetalWidth;

        [Column("4")]
        [ColumnName("Label")]
        public string Label;
    }
}

//IrisPrediction.cs
using Microsoft.ML.Runtime.Api;

namespace serverlessfunctionapp.Predict
{
    public class IrisPrediction
    {
        [ColumnName("PredictedLabel")]
        public string PredictedLabels;
    }
}
Write Function Logic
With our dependencies and data structures set up, it's time to write our function logic to make predictions. The first thing we want to do is replace the Run method inside the Predict class with the following code.
public static IActionResult Run(
    [HttpTrigger(AuthorizationLevel.Function, "get", "post", Route = null)]HttpRequest req,
    [Blob("models/model.zip", FileAccess.Read, Connection = "AzureWebJobsStorage")] Stream serializedModel,
    TraceWriter log)
{
    // Workaround for Azure Functions Host
    if (typeof(Microsoft.ML.Runtime.Data.LoadTransform) == null ||
        typeof(Microsoft.ML.Runtime.Learners.LinearClassificationTrainer) == null ||
        typeof(Microsoft.ML.Runtime.Internal.CpuMath.SseUtils) == null ||
        typeof(Microsoft.ML.Runtime.FastTree.FastTree) == null)
    {
        log.Error("Error loading ML.NET");
        return new StatusCodeResult(500);
    }

    //Read incoming request body
    string requestBody = new StreamReader(req.Body).ReadToEnd();

    log.Info(requestBody);

    //Bind request body to IrisData object
    IrisData data = JsonConvert.DeserializeObject<IrisData>(requestBody);

    //Load prediction model
    var model = PredictionModel.ReadAsync<IrisData, IrisPrediction>(serializedModel).Result;

    //Make prediction
    IrisPrediction prediction = model.Predict(data);

    //Return prediction
    return (IActionResult)new OkObjectResult(prediction.PredictedLabels);
}
There are a few notable change worth looking at. One of them is the workaround at the beginning of the function.
if (typeof(Microsoft.ML.Runtime.Data.LoadTransform) == null ||
    typeof(Microsoft.ML.Runtime.Learners.LinearClassificationTrainer) == null ||
    typeof(Microsoft.ML.Runtime.Internal.CpuMath.SseUtils) == null ||
    typeof(Microsoft.ML.Runtime.FastTree.FastTree) == null)
{
    log.Error("Error loading ML.NET");
    return new StatusCodeResult(500);
}
There are some issues with Azure Functions and ML.NET Assemblies which are being worked on by both teams at Microsoft (see Github Issue). In the meantime, it's safe to just include that code in there.
The other addition to note is the method signature. As you can see, I have added an additional parameter called serializedModel which is decorated by the Blob attribute.
[Blob("models/model.zip", FileAccess.Read, Connection = "AzureWebJobsStorage")] Stream serializedModel
What this code is doing is telling the function to import the blob model.zip as a Stream and bind it to serializedModel. Using additional arguments, I tell my function to only have Read access to the model.zip blob inside the models container which can be accessed with the AzureWebJobsStorage connection string. Right now that last part might seem confusing, but this is something we configured when we set up the Azure environment and linked azfnmlnetdemostorage account with our azfnmlnetdemo20180821 serverless function app using the --storage-account option. Although the production environment is configured, if we try to test our application locally we won't be able to access our storage account because we have not configured the connection string locally. We can do so by looking in the local.settings.json file inside our serverlessfunctionapp directory. The contents should look like the following.
{
  "IsEncrypted": false,
  "Values": {
    "AzureWebJobsStorage": "",
    "AzureWebJobsDashboard": "",
    "FUNCTIONS_WORKER_RUNTIME": "dotnet"
  }
}
Our function running locally will look in this file, try to find AzureWebJobsStorage and use the connection string value in the Predict function. To get the connection string for our azfnmlnetdemostorage account, enter the following command.
az storage account show-connection-string --name azfnmlnetdemostorage
The output of that command should look like the following:
{
  "connectionString": "<YOUR-CONNECTION-STRING>"
}
At this point, you just need to copy the value of connectionString to your local.settings.json file and replace the current empty string for AzureWebJobsStorage. It's important to note that it's okay to paste the connection string in here since the local.settings.json file is not committed to version control. (See .gitignore inside serverlessfunctionapp directory). Now the application is ready to be tested locally.
Testing The Function Locally
To test the application, first build your project by entering the following command from the serverlessfunctionapp directory.
dotnet build
Then, navigate to the build directory ./bin/Debug/netstandard2.0 and enter the following command:
func host start
Finally, using a tool like Postman or Insomnia make an HTTP POST request to the http://localhost:7071/api/Predict endpoint with the following body:
{
  "SepalLength": 3.3,
  "SepalWidth": 1.6,
  "PetalLength": 0.2,
  "PetalWidth": 5.1
}
If everything is set up correctly, you should receive the following output
Iris-virginica
Once satisfied with testing, press Ctrl + C to stop the application.
Deploy To Azure
Push Build
Great! Now on to the final step, deploying our application to production. Since we already configured everything it should only require a few commands to do so.
First, make sure you are logged in. Using Azure Functions Core Tools log in with the following command:
func azure login
Like with the Azure CLI, you will follow a series of prompts to log into your account.
Once you have successfully logged in, it's time to publish our application to Azure. From the serverlessfunctionapp directory enter the following command.
func azure functionapp publish azfnmlnetdemo20180821
When our deployment is complete, we can check whether our function was published successfully by using the following command.
func azure functionapp list-functions azfnmlnetdemo20180821
The output should look similar to that below.
Functions in azfnmlnetdemo20180821:
    Predict - [httpTrigger]
Configure Platform
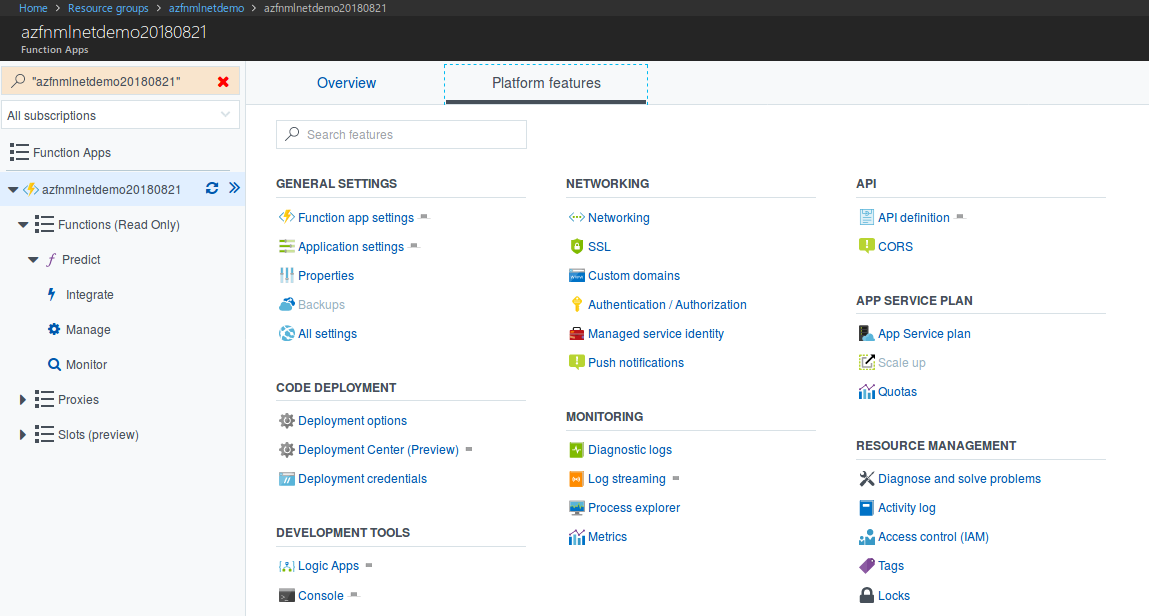
For the last part of the deployment step, we'll need to head over to the Azure Portal. To do so, visit https://portal.azure.com and log in.
Once logged in, type the name of your application into the search bar at the top of the page and select your Azure Function application of type App Service

Then, from the accordion element on the left, select the top-most item with your appplication name on it. Then, select the Platform features tab and open the Application settings option.
When the Application settings page loads, change the Platform setting to 64-bit. The reason for this is ML.NET has to be built and run on a 64-bit environment due to some of its native dependencies.
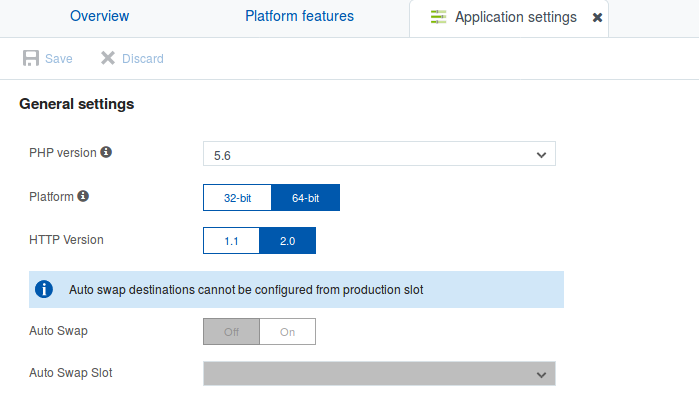
That's all there is to it.
Test The Deployed Function
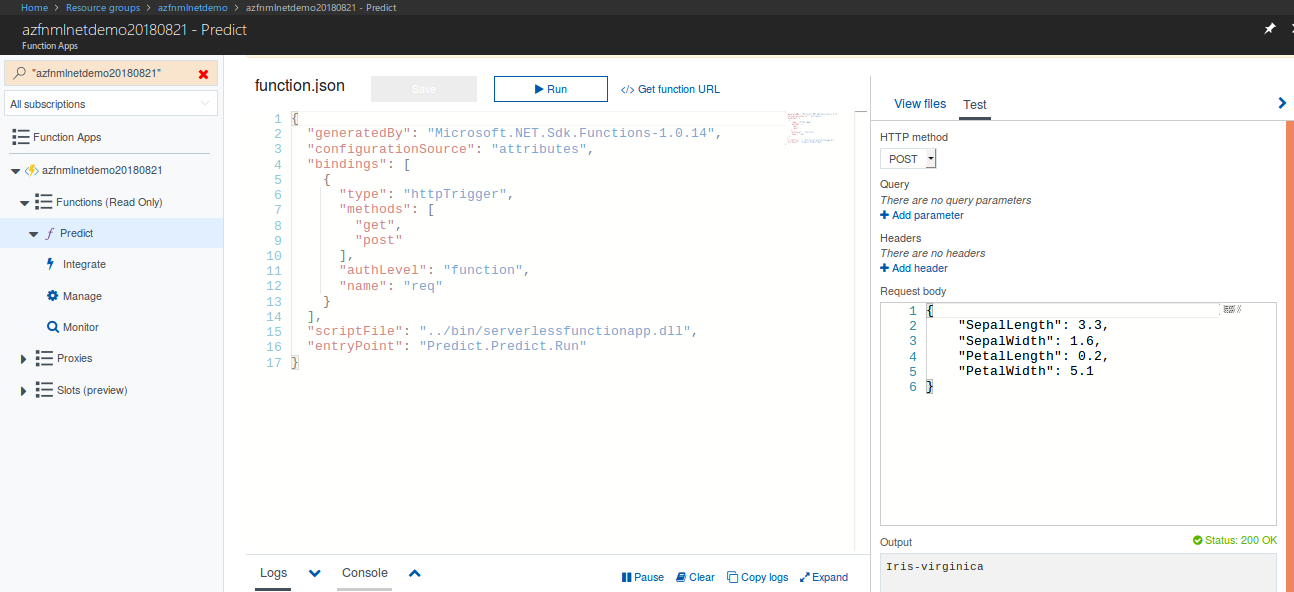
Now it's time to test our deployed function. We can do so from the portal by going back to the accordion and selecting the function name below the Functions parent element and clicking on the Test button on the far right. Doing so will show a form that will allow us to test our application. Make sure the HTTP method option is set to POST. In the text area for the Request body paste the following content:
{
  "SepalLength": 3.3,
  "SepalWidth": 1.6,
  "PetalLength": 0.2,
  "PetalWidth": 5.1
}
Once the form is filled in, click Run at the top of the page and if successful Iris-virginica should show up in the Output area.
To test the function outside the portal, you can click on the Get function URL link next to the Run button and make an HTTP POST request using that link.
Conclusion
In this writeup, we trained a classification model that predicts a class of flower using Microsoft's ML.NET framework. Then, we exposed this model for inference via an Azure Functions serverless application. In doing so, we can more efficiently manage our cost as well as our resource utilization. Happy coding!
Resources
Create a function app for serverless code execution
Using the Azure CLI 2.0 with Azure Storage
Work with Azure Functions Core Tools